Carla Like It Is

Head Over Heels Series

Head Over Heels DIY Friday: How to do Two Weeks in Europe with a Carry-On

Kayd Roy5 Comments
I think I've recovered from my terribly busy birthday thankfully, all that crazy prep is starting to feel worth it!  Now, I am ready to let go of everything and embrace our big European Vacation Part Duex!

Since the only thing I've been working on is figuring out how to pack for two weeks in Europe only using a carry-on, I figured I should share the experience.  Not only is it easier hauling around smaller carry-on luggage, but with how much airlines charge to check a bag these days we knew we'd save extra cash with the carry-on luggage approach.  Here's all the crap-o-la I'm bringing...
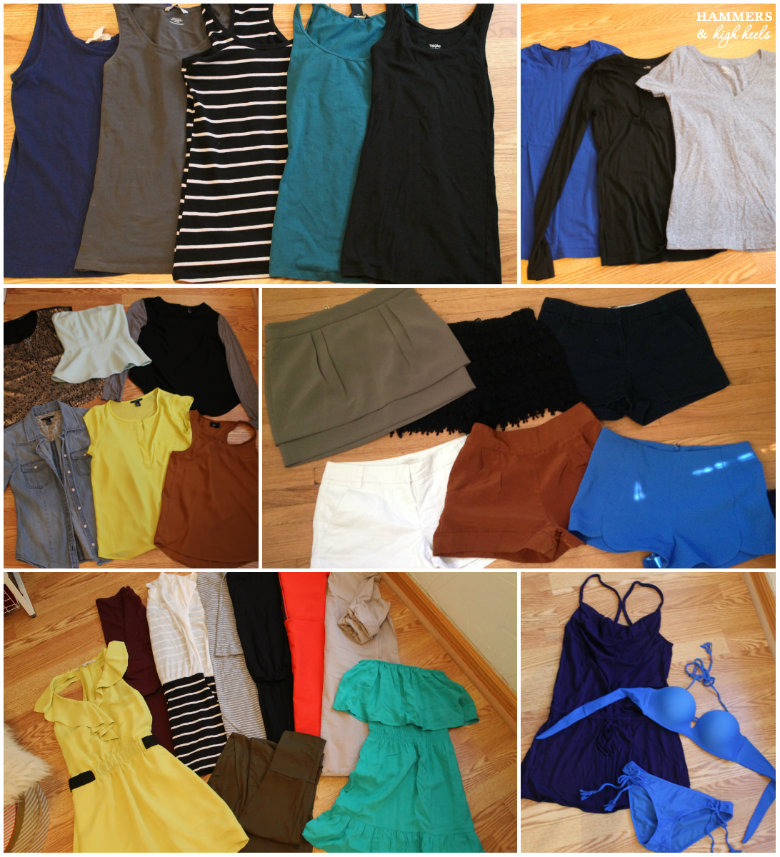
5 tanks, 3 tee-shirts, 6 shirts/blouses, 5 pairs of shorts + 1 skirt, 8 dresses, 1 swim cover-up, 1 swim suit

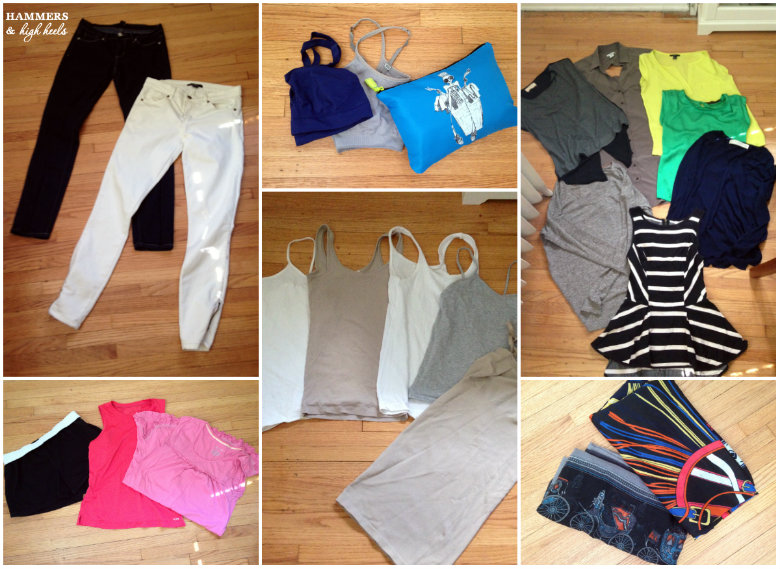
2 pairs of jeans, 2 sports bras, panties are in the blue zipped pouch and bras aren't photographed (that just seems to personal and weird to show), 4 additional shirts (one accidentally show twice but not counted), 2 sweaters, 4 undergarment tanks + 1 slip, 2 sets of PJ's, 2 scarves


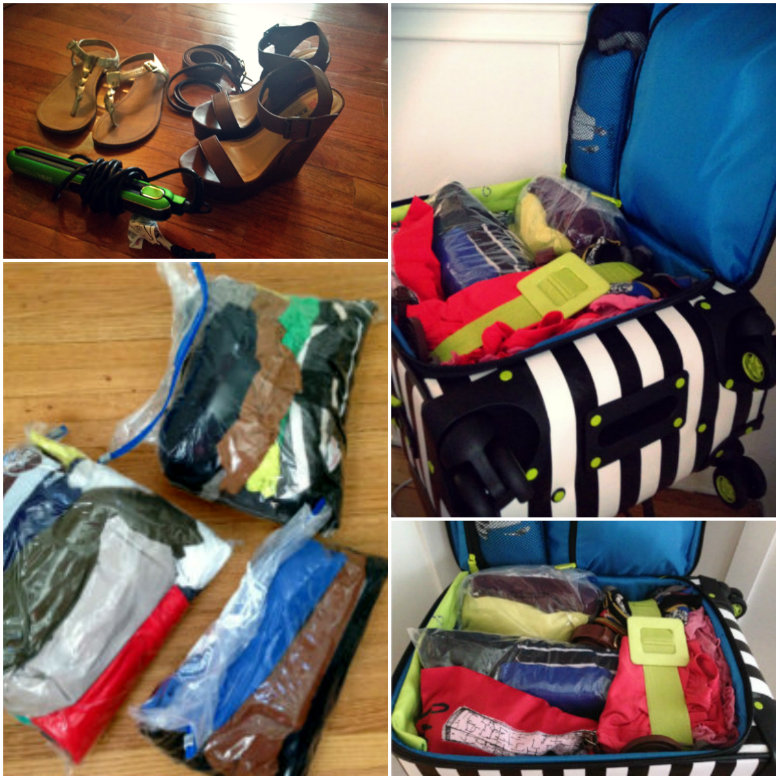
1 pair of flat sandals, 1 pair of wedge sandals, flat iron, 2 belts; other items like make-up, hairbrush and toilets not photographed
 After gathering everything, I rolled up the dresses, shorts, and shirts then placed them into large Hefty zip storage bags.  Once in the bag I rolled the empty top space and let all the excess air out resulting in some densely packaged clothing which saves a TON of space in a carry on bag!  I took a couple photos of my carry-on luggage all packed an ready to go shown above.  I know it's a little OCD crazy organized but that's how I roll!   

It was a little challenging and I had to sort of map out what I planned to wear each day on the trip but I'm Head Over Heels for this minimalist approach for a long vacation!  Who wants to spend time sifting through tons of clothes and luggage when you could be out exploring instead anyway?

I will be sure to share photos from my Europe trip and if I was able to make it through easily with what I packed for Prague, Milan, Rome, and Dubrovnik!  At least the hot summer weather helped since I didn't need big bulky stuff for cold weather too!

What do you think of my crazy approach to packing? 
Do you have other suggestions for making through a long trip with only a carry-on too? 
Please share, I'd love to know before I go!

Have a great weekend everybody!

Head Over Heels DIY Friday: Brynn's 1st Birthday Ensemble!

Kayd Roy3 Comments
Today's DIY is tu-tu much fun and it requires no sewing, woo-hoo!  About a month ago, my sister Holly asked if I would be able to help make a cute 1st birthday outfit for my niece that included a tutu and "1" onesie- Well duh, of course I would! I would have helped to make anything for my little niece's birthday but I was pretty pumped to make a tutu! 

Not gonna lie, I kind of want a tutu for myself for no particular reason, LOL!  But I certainly wouldn't make a tutu look as stinkin' cute as Brynn did on her 1st birthday, just look at this happy little cutie pie...
 My sister picked up the supplies, here is what you need to make the birthday onesie and tutu: - 3 yards of tulle (amount will vary depending on the size and poofy-ness of tutu)
- Elastic
- Plain onesie
- Patterned fabric (small scrap amount)
- Heat n' Bond Iron-on Adhesive
- Scissors
- Number stencil or print out to trace onto fabric

Let's start with the tutu!
Begin by cutting the tulle into 4" wide strip that measure double the length you want the tutu skirt to be.  I measured Brynn's length to be 7.0", so I cut strips that were 4.0" wide and 14.0" in length (this is because you will fold it over the elastic waist).  As you can see in the below photos, I had 6 layers of tulle stacked up so I could get all the pieces cut faster- individually would take waayyy too long for my attention span :)
I also cut the ends at an angle so the tulle skirt would have a little dimension and not be a flat-edged tutu.

Once you have all the strips cut, grab your elastic and cut it to size and just tie the ends together (you can sew if you want to, but I did a no-sew version).  Then, all you do from there is fold it in half over the elastic and tie it on!  It's so stinkin' easy!
Just know if you want a good amount of poofy-ness on the tutu you will be tying a lot of tulle onto the elastic waist- but it is totally worth it! Who doesn't need a poofy tutu?!?

Onto the "1" onesie!
Here all you do is take your patterned fabric, trace what you want to add on the onesie (for me it was "1"), cut out what you traced, and then use the Heat n' Bond iron-on adhesive to add onto the onesie.  Again, super easy and no sewing required!

My little niece looked so dang adorable in her birthday outfit!  I was bummed I couldn't be in Michigan for the party but thankfully I will be able to see her and my nephew Henri one week from today (and possibly meet my new nephew, my sister-in-law is nearing her due date)I can't wait!

Well, I'm Head Over Heels for this tutorial- How could I not be?!? 

What do you think?  Do you love Brynn's first birthday look?
Do you secretly want a tutu too?  Or am I crazy?!

Have a great weekend everyone!

Head Over Heels DIY Friday: Staple Gun Seat Tufting

Kayd RoyComment
I attacked a DIY that I've never done before- tufting!  I had always been afraid to try it myself but it turned out to be easier than I thought it would be and I'm very thankful for that considering it has been the only thing that went as planned when it came to my "Stupid" Chair redo project

So, after all the failed fabric choices, painting, and repainting I made the decision to go with a dark burgundy fabric to compliment the midnight navy blue chair color.  But to give the solid color surface some interest and dimension, I knew it was time to figure out how to add some tufting.  Dun-dun- dunnnn....
When it came to DIY tufting, I had only seen folks do it by drilling a hole, sewing on a button through that hole, and a bunch of other random steps along the way which made it seem to complicated.  I wondered if it was possible to get the look just using a staple gun because let's face it, a staple gun is much more user friendly than a power drill (and requires no over-the-shoulder supervision from Alex, LOL). 

I started by marking the placement for each button/tuft that would be on the seat cushion.  In order to make sure the fabric would spread and tuck evenly outward, I marked the first tuft in the center of the cushion and measured out 6.5" from there for the other four tufts. 
Then, I used scissors to sort of carve out the foam in the marked spots.  This allows a clear path for the staple gun to staple directly into the wood surface beneath the foam. 

I added my first staple in that center position so that I could work the fabric evenly outward from there. After I got the first staple in place, I pressed my finger into the spot where the next staple would go to test out how the fabric would lay and fold out.  I did this to make sure I wasn't stapling the fabric too loose or tight.
It takes a bit of folding, pulling, adjusting, and readjusting to get the look of the fabric just right as it folds out from each tuft.  It is a bit tricky but you'll get a feel for it after you do a couple.

Once I had all the tufts in place, I pulled the fabric taut and began to staple it in place on the underside of the seat cushion (stapling into the wood).  This part also called for some more pulling and folding to keep the wrapped edge and center tufts looking clean and crisp.
After you finish stapling, you have a tufted cushion!

The last step is to then add buttons to cover the stapled tufts- and this part is the only unique challenge with the staple gun tufting method (but honestly not as bad as that whole drilling and sewing through drilled holes thing).  Since I didn't have buttons that matched the color and fabric I had chosen, I dug some out from my button bin to cover with the fabric.  I simply cut a small circle of fabric and tied the wrapped fabric to the bottom loop of the button.... 
After I had the matching buttons ready I threaded my sewing needle, pushed the foam around the stapled tuft down, and stitched the button into place.  I learned that it would have been easier to do with an upholstery needle instead of the straight needle shown in my photos because that foam will fight back when you move your needle!

With all the fabric secured underneath, my cushion was complete!  One cushion down, one to go, but here's a sneak peek of the chair color and fabric cushion combo...

I'm already Head Over Heels!  Can't wait to have two of them!

What do you think of the fabric and color choice?  Are you liking the tufting? 

Hope to work on the next cushion tonight and have some after pics of the set along with decorative pillows tomorrow!  I'm excited for this heat wave to break tomorrow, hooray!  Have a lovely weekend everyone!

Head Over Heels DIY Friday: Heather's Master Bedroom Update

Kayd RoyComment
A couple week's ago my cousin's wife Heather asked me for some decor advice for their Master Bedroom so I decided to pull together some ideas that she'd (hopefully) be Head Over Heels for! 

Heather purchased the Lucianna Duvet from Pottery Barn to kick off her redecorating project and hoped to add in a robin's egg blue as an accent color.  To get an idea of the space, I asked her to sent a couple photos so I could get an idea of how to bring the colors together...

She also mentioned that she needed ideas for wall art above their headboard.  So, after a little online "window" shopping, here's what I came up with....
Pillow Target $33.00  Diamond Pillow: Target $16.99  Threshold Fretwork Border Window Panel: Target $24.99  Threshold Tear Drop Glass Lamp Base: Target $46.99  Threshold Burlap Lamp Shade: Target $15.79   Ribba Photo Frames: Ikea $14.99

Since the wood tone of the headboard felt similar to the wall color, I thought it would pop better if it were painted white (gotta have a little DIY action right?) and the white matches the wood trim in the room as wellThe rest of the accessories all came from Target (Heather already has the lamp & shade) except the photo wall frames, but I imagine Target has similar frames too.  I even found a few things I wanted for our house during my online "window" shopping which includes those Fretwork window panels, they come in like five colors and I love them all!
Now Heather can decide if she is Head Over Heels for look or not but I hope she is (I know I am)!  I had fun putting together the idea board too, so if anyone else needs some ideas for a room feel free to send me an email!

What do you think of the look? 
What other ideas do you have for Heather for their Bedroom?

Head Over Heels DIY Friday: One Room, Three Ways

Kayd Roy3 Comments
For this week's DIY, I was inspired by Layla's One Room, Three Ways post over at The Lettered Cottage and thought the Dining Room would be fun to use for the challenge!  Afterall, we've revamped the space in stages, so it's fun to see the different looks as it evolved and who knows how long it'll be until I start itching for a fresh look.  Gotta keep dreaming right?!?

So, here's the room in three different looks- two actual looks and one faux photoshopped look of a whole new scheme I had been pondering about...
I have to say, it was pretty fun to compare the three looks side-by-side and for fun I guess I could say it's One Room, Four Ways if you count the very, very "before" look of the space when we moved in...
From there, we added fresh paint (Behr's Sequoia Grove), a sideboard from Ikea, new pendant light fixture, and my DIY Numbered Chair Covers (click here for the tutorial to make your own!).
About two years later, we grew tired of the look and thought it was missing something.  It needed some depth/dimension and character, so Alex added in wainscoting to freshen up the space. 
Ahhh!  It did look fresher, brighter, and it certainly added some character that it lacked with the plain flat painted walls.  From there, I've only changed up the table and sideboard decor but that is how the space has remained for the most part. 

I guess the only question I have about the newest look was "where did the chair covers go?" and I still have them but I don't always keep them on since the leather is much easier to care for when it comes to the day-to-day.  But I do admit that when I look back at the photos, they do look nice and maybe I should keep them on the chairs more often?  They do brighten up the look of our dining room and give it a unique look...

So for my dreamed-up third dining room version I started there, then wondered how a lighter paint color would look, and a new light fixture.  Wowzers!  It had a whole different vibe and I kinda love it!
When I look at all the looks side-by-side, I really do love the idea of completely revamping the space (again) but I still love the warmth of the red-ish paint tone in our dining space.  Perhaps it's because in the summer I want things lighter and brighter but I don't think I'm ready to commit to a new color just yet. 
I will say, this photoshopped image makes me want a new light fixture and right now.  I loved that pendant light when we bought four and a half years ago but I'm not loving it as much now.  Who knew it'd look so blah after just 4.5 years, or maybe I just love the look of that drum shade pendant light a whole lot more right now?  I know we don't need it, so if you have recommendations for a place to buy a drum shade light fixture at a reasonable price please let me know! 
Which Dining Room look are you Head Over Heels for?
Where can I find a nice drum shade light fixture at a good price?

Hope everyone has a great weekend, I know we will with my sister, brother-in-law, and (almost) 1 year old niece here for a visit!!!  I'm sure I'll have lots of cute pics to share with you later!  Now, time to link this post up over at The Lettered Cottage "One Room, Three Ways" Linky Party!

Head Over Heels DIY(?) Friday: Chair Project Help

Kayd Roy15 Comments
Well, not much DIY-ing going as planned (wa-wa).  In it's place is a lot of "ugh, what should I do?" since I got the fabric I order in the mail for my latest chair redo project.  Sure, the fabric is exactly what I picked out but now that I am seeing the texture and scale of the pattern with the chair I'm second guessing my choice :(

So, I am wondering if I can get some help from you out there?  Please take a look at the pictures I took of the chair with the fabric- and keep in mind I need to paint the chairs still (they are a bit roughed up from sanding). 
What would you do? 
Do you think the fabric looks nice?
If you keep the fabric, what color would you paint the chairs?

Now if you feel kind of ehh about it or flat out hate it, I have a second thought option (I also need your opinion here).  I admit, I like watching the Fashion Police on E! and given my current predicament, I couldn't help but wonder if I should update these chairs with a similar look to the ones on their set?  Basically, the wood would be white with dark gray slubby fabric and nailhead trim.  They just look so cute and classic when I see them on the show.  Hmmm...
Fashion Police set via E! Online  |  Louis Chair via Jonathan Adler


What do you think? What kind of look would make you Head Over Heels for these chairs?
I think I might be in a DIY rut :(  Please help me out if you have a moment to post a comment, I'd really appreciate it!

Head Over Heels DIY Friday: Printed Cloth from India Mounted on Canvas

Kayd Roy1 Comment
Remember that hand printed cloth I got at the Delhi Haat Market during my India trip?  Well, I finally figured out how to display it as wall art!  Geeze, that only took me five months to figure out, sheesh!  But here's a look at this week's DIY creation...

When I purchased it I knew I loved it, but didn't quite know what I was going to do with it.  I knew I didn't want to just frame it behind a glass, but what about a canvas?  Paintings done on canvas get wrapped onto a wood frame and they look beautiful and authentic.  I thought it'd be the perfect way to display the printed cloth! 

So, I popped over to JoAnne's and picked up a canvas to mount the fabric on.  I wanted to make my own wood frame, but sadly didn't have enough time (or energy really) to build one.  Once I got it home, I centered the cloth on the canvas and got ready to attach it to the frame.
I decided to use flat thumbtacks instead of a staple gun to attach the cloth.  I'm not sure if staple guns are used for attaching most canvas cloths to wood frames but that is the way I've always seen them.  I thought the thumbtacks would be less likely to ruin the cloth or if for any reason I want to take the cloth down I will still be able to.  I ensured that the cloth stayed evenly placed as I added the tacks about 3"- 4" apart around the frame.
Once it was finished I mounted it to the wall in our stairwell which is full of other wall art and photos from our travels.  I love that you can still see the authentic print and texture in the fabric since it isn't behind glass.  Certainly a unique piece in our stairwell now!

I'm so happy that the printed cloth is now proudly displayed instead of folded up in my project pile.  Head Over Heels for my new piece of wall art from India!

What do you think of my display idea for the cloth/tapestry?
What other ways would you have displayed it?

Head Over Heels DIY Friday: Gold Zip Trim Scarf

Kayd Roy7 Comments
Remember a few weeks ago when I shared my tutorial for the Zipper-Cape?  Near the end I mentioned that I had some navy blue fabric that I wanted to use for another scarf so.... I did, but this version is BIGGER & BETTER and I am going to tell you how to make one too!

Take a look at my versatile creation- the Gold-Zip Trim Scarf!
 To make your own, here is all you need:
- 49.0" Width x 61.0" Length piece of fabric (finished size is 24.0" W x 60.0" L).
* Note- you can use two separate pieces of fabric in 25.0" W x 61.0" L sewn together also
- 24.0" long separating zipper
- Basics: sewing thread, pins, sewing needle or machine, scissors

Start with fabric folded wrong-side out and pin edges together.  Then, sew the 60.0" length and one of the 24.0" sides.  Be sure to leave one of the 24.0" sides unsewn.

Pull the fabric right-side out through the open end, pin edges, and sew the last 24.0" side together.
 The step is adding the separating zipper in.  Start by unzipping and separating each side and pin in place. 

Ready?  Here's the tricky part...
You will add one side of the zipper 4.0" from the 24.0" end.  The other part of the zipper will go on the reverse side of the scarf along the length 4.0" from the top edge.  Then stitch both in place.

Not too tough right?  Now start playing!  Zip, loop, twist, drape, wrap, and whatever else as you figure out your favorite ways to wear it.  Here are some of my favorites!

You probably already know this, but I am a sucker for anything that you can wear multiple ways or has added functionality, so I'm definitely Head Over Heels for this DIY! 
Are you too? 
What do you think of the Gold Zip Trim Scarf?

Here are the links to my other Multi-Wear Scarves if you are up for some more sewing!

Make sure to let me know if you try making one too!  Have a great weekend!

Head Over Heels DIY Friday: Summer Style Kick-Off for Memorial Day Weekend!

Kayd RoyComment
Let's be honest, when it comes to Memorial Day weekend who can think about any kind of project when it's the official kick off of Summer?!?  I know I can't right now, all I can picture is BBQ or picnic food, ice cold cocktails, and diving head first into warm weather fashion (finally!).  So this week I wanted to share my style inspiration and party ideas for Memorial Day weekend- let's take a look!
Blackberry & Watermelon Crush Cocktail Recipe: Stagetecture   |  Hot Dog Bar: Bon Appetite  |  Strawberry Shortcake Dessert in Jars: Dole  |Awning Stripe Outdoor Pillows: Pottery Barn  |  Stripe Wedge Sandal: Zara  |  Anchor Charm Necklace & Chain Cuff: Forever 21  |  Pleated Cherry Red Shorts: Forever 21  |  Two-piece Stripe Swimwear: Target Xhilaration Brand  |  Outdoor Cafe String Lights: Pottery Barn

Anything striking you too?  I'm dying to get those stripe wedges and the pleated red shorts, how cute would that look with a white tank on top?  I'm loving it all really though I guess, but right now I really want a hot dog now, LOL!  Head Over Heels for hot dogs, ha!
Alright, I'm otta here!  It's time to unplug for this three day weekend so Alex and I can (try) to relax and enjoy!  Woo-hoo, it's summertime ya'll!!!!  

What will you be up to this weekend?
What summer fashion favorites are you excited to pull out from storage or purchase?

Hope you have a gorgeous weekend with family, friends, food and fun!  Cheers!

Head Over Heels DIY Friday: Summer Styled Rope Mirrors and Candle Holders

Kayd Roy1 Comment
Hello and happy Friday!  I have a sort of Summer DIY decor post for you today, because honestly I'm confused about whether we are in spring or summer right now.  It feels like we just skipped over spring and went right into summer here in Minnesota, does it feel like that where you are?  I know Memorial Day is next week which is the official start to summer, but heck it was freezing a week or two ago so let's just call it summer I say! 

Now onto my summer styled DIY project- Rope Mirrors and Candle Holders!
I've been seeing a lot of home decor made with rope lately and figured I could add it to some mirrors or candle holders at home.  So, I grabbed some Sisal rope from Home Depot for just $8.81 to add onto three glass candle holders and two mirrors I had at home.

For the candle holders, all I did was wrap the sisal rope around a few times and then pinning the ends to hold them on (no glue required on these!).

The mirrors were a little trickier and required the use of a hot glue gun.  I cut enough rope to go around my square Ikea mirrors three times with a bit extra to loop at the top.  I glued the rope in place around the edge of the mirror (shown in images below).
For my round mirror it was a bit easier.  I just placed cut rope on the inner edge of my mirror and glued the ends together.

Easy-peasy right?!?!?

I'm Head Over Heels for this simple DIY's, are you?!?!

I'm loving this fresh summer-y update for the mirrors & lanterns, but right now they are on my mantel and I feel like we are lacking some color.  So, help a girl out!  Tell me...

What could I add to the mantel or fireplace itself that would add color and compliment the rope/summer theme?

Head Over Heels DIY Friday: A Coordinating Navy Blue Cabinet for the Closet

Kayd Roy1 Comment
It is a GORGEOUS Friday here in Minneapolis, makes me excited to kickoff the weekend!  This week's DIY is a pretty simple furniture redo that I just had to do because of how much I loved my updated navy blue campaign dresser.  It totally needed a buddy right? 

The only bummer about this DIY is that I missed a MAJOR step- yes, I forgot to take a "before" photo.  I know, I know, how the heck could I miss that?!?!  I am wondering that too, but the cabinet was just white before with silver hardware so I found a similar looking cabinet online to give you an idea.  It was a cabinet that the previous homeowner had in our upper level bathroom.  We didn't need it in the space so it was just stored in our basement... Until now!
I removed the hardware and used the same Rust-o-leum glossy navy blue paint that I used on the dresser.  For the hardware, I actually had some old knobs that had a unique look so I just painted them gold to match the dresser.  I figured they would work fine since I couldn't get or fit the same hardware that was on the campaign dresser.
I cleaned it off, added the hardware, and brought it up to my closet roomHere's how it's looking! 
I think just that little bit of extra storage was the missing puzzle piece for my Closet-Room redo (I still need to take all the 'after' photos though, stay tuned!). 

I know I am Head Over Heels for this DIY, especially because it was free and I put some clutter from our basement to good use!

What do you think?  Are you Head Over Heels for the revamped look?
Hope you will be back to see the full Closet-Room "afters"!

Before I go, in case you missed our 3rd Blog-a-versary post be sure to check it out and leave us a comment to win a $25 Home Depot gift card!  For those that already left us comments, thank you so much!  They have been really fun to read and make me so happy for keeping up with the blog :)  We will announce the winner on Wednesday, May 15th.

Head Over Heels DIY Friday: My 2013 Kentucky Derby Hat!

Kayd Roy4 Comments
Giddy-up!!!  We're gearing up for the Kentucky Derby this weekend!   But... no, we aren't headed to the Churchill Downs (sadly, because how awesome would that be?).  We will be heading to the 2nd most awesome place to be on Derby day- our friend's annual Kentucky Derby Party! 

I know it might sound silly but it is probably my favorite "theme" party.  Think about it, everybody dresses up in their best southern type style, you can place bets for a little friendly competition, sip mint juleps, and it's a must for ladies to wear their biggest or best derby hat (which is my favorite part of course)We've attended their party for the past two years and I'm so excited for year three!  We always have a great time and the photos are cute memories to look back on.  It's a theme the boys love to get in on too!

So naturally, the DIY on my mind this week is my Derby Hat!  As you can see in our 2011 and 2012 photos, I went for the big hat look.  This year I'm switching it up with a smaller cloche style hat.  I was totally inspired by Marisa Miller's 2011 look, small hat but big style!
Inspiration via Bad Joan, Etsy, My Scoop, and Makowsky Millinery

I got lucky and found a perfect hat on clearance at Target for $6.48!  Then all I did was add some ribbon and a peacock feather embellishment from JoAnne's for $3.99.

I don't wear hats all that often so it feels extra fun and costume-y, totally Head Over Heels!  Now if only the weather would cooperate so I don't have to wear snowpants to the party.... shhhesh!


How about you? 

Will you be sporting a Derby Hat this weekend? Or attending a Derby themed party? 
Better yet, which horse are you betting on (we could use tips on that one!)? 

Remember, whether or not you attend a party wearing a pretty hat still fun!  Have a great weekend!

Head Over Heels DIY Friday: Multi-Wear Zipper Cape (Cape/Poncho Revamp)

Kayd Roy1 Comment
Sorry I have been a little MIA from the blog this week, work was crazy busy this week and my brain couldn't handle much else. Writing a post might have made my head explode :)  Thankfully, my head is still in tact so I can share a DIY post with you today!  So happy it's Friday!!!

Remember that Cape/Poncho I made a while back?  Well I came up with a new and improved version!  Take a look at the Multi-Wear Zipper Cape!
Don't you love Multi-Wear clothes and accessories?!?  My Mutli-Wear Snap Scarf is still one of our most popular posts so my guess is that you love multi-wear too!? 

Even though I still like the first DIY version of this cape, it just wasn't as versatile as I wanted it to be...
I wore it a couple times and came to the realization that no matter what, it had to go over your head to take it on or off- and that was really the only way you could wear it.  I thought it'd be nice if it had the functionality to just wear as a wrap...  Why, oh why did I sew that darn seam? 

But that was the answer, such an easy fix!  So, I took out the seam I had sewn in the first DIY and replaced it with a separating zipper. 

All other parts of the DIY stayed the same....

That very simple change of adding a zipper allowed for so many different ways it could be worn! 

Thanks Jenny for playing model and making the cape look so cute!

I just LOVE that chunky gold zipper!  It has a thicker utility kind of feel to it that makes the whole thing more raw/edgy looking... ugh love!  I'm gearing up to make another one using a lighter wool-blend fabric in Navy Blue.  It will have a more drape-y summer type look to it- perfect for cooler summer nights! 

I'm Head Over Heels for this versatile look, how about you? 

Would you like to see a photo of the Summer-y Navy Blue one too once I finish it?

Well, I'm happy to report that Spring finally arrived here in Minnesota!  I hope I am not jinxing it by typing this though, we did have a snow storm just seven days ago but it's almost 70 degrees here!  So, I'm going to get outside and enjoy the rest of the day and weekend!  I promise I will try to squeeze in some work on my closet room though :)  ready to wrap that one up! 

Hope you have a beautiful Spring-y weather weekend too! See you soon!

Head Over Heels DIY Friday: Greek Key Window Shades

Kayd Roy1 Comment
Did you happen to catch my closet inspiration post yesterday?  I couldn't get that Greek Key patterned window shade out of my head.  Not just because I loved the idea, but I couldn't stop thinking about DIY-ing it- so I did!

When it came to window treatments for my closet-room, I knew I didn't want anything super colorful or patterned in that space since I have clothing and shoe crazy-ness all over most of the room already.  This kind of look would fit perfectly, just simple and refined....
Images via The Nesting Game | Lonny Magazine | Effortless Style  | Decor Pad

... But I guess "simple" just stuck out to me? 
There must be some kind of strange equation in my brain: Simple + Idea x Carla / Budget$ = DIY  ?
Basically, it is a roman shade with a pattern around the border.  I figured I should just buy a plain white shade and add the border myself!

With all my clothes next to windows, the most important thing was getting something that will block the light from hitting and fading the fabric- oh the horror!  I got plain 55" width Light Filtering Roller Shades from Home Depot for $14.25 each, which had to be cut to 46.75" wide for my windows.  For the Greek Key pattern I used violet colored 3M Color Vinyl Electrical Tape from Home Depot as well for $3.99.  I know, I know, electrical tape indeed sounds odd, but here's the thing- the shade itself was vinyl and the tape is vinyl, therefore it's acceptable.  Vinyl tape on other things like fabric, shoes, furniture, your face, etc. is not acceptable- Just wanted to clarify my DIY logic because I know the whole tape thing sounds nuts!

I started by mapping out the placement for the Greek Key design (there are a few variations to a Greek Key pattern, mine is different the ones shown above).  Keep in mind all the measurements included are based on the size of my windows.  Here are the steps I followed to create the look...

NOTE: It is very important to make sure that you aren't letting the edges/ends of the tape overlap! If you do, your handmade tape creation will be really handmade obvious :) do your best to avoid that! Take your time, measure out each piece of tape to cut, and cut tape ends straight at a 90 degree angle.

To create the next section of the pattern, I spaced it out half the width of my squares.  From there you pretty much connect the dots....


Here's some progress pictures of the pattern coming together. It was pretty time consuming since I wanted it to turn out nice, but totally worth it! 

Once the pattern was complete, I hung the shade using the coordinating brackets from Home Depot.  Here's a look of the Greek Key pattern shade mounted in the window....

One down, four to go... ugh exciting!  Still, I'm pretty sure I'm Head Over Heels for this DIY- yes tape and all!  It's a simple way to add some style to low cost window shades for sure!

I'll be compiling all my photos from Junk Bonanza tomorrow, can't wait to show you the "treasures" took home!  What are you up to this weekend?

- Anyone else going to look for treasures at Junk Bonanza?
- What do you think of the DIY Greek Key Window Shade project?
- What other fun DIY Window Treatments have you created?  I'd love to know!

Head Over Heels DIY Friday: No Sew Tuxedo Stripe Pants

Kayd Roy2 Comments
Happy Friday everyone!  Today I have an easy and fashionable DIY to help get me out of these -ahem- APRIL winter blues.  Seriously winter you can stop now, most of us would like to embrace Spring and freshen up our homes, gardens, and see the darn sunshine again!

Okay, back to the DIY- Let's get on this trend and make some No Sew Tuxedo Stripe Pants! 
Image via Who What Wear
I've been dying to make these for a while now, I see them all the time and love the look!  Sadly, I haven't found any in stores that are the right look & fit.  So, I took a pair of skinny trousers from my closet and make my own!
All you need is a pair of pants/ jeans/ trousers (I think this tutorial works on most fabrics), an iron, scissors, Stitch Witchery, and fabric ribbon.  Make sure that the ribbon is made of fabric and not the paper-y/ crafty kind of stuff because it will basically melt when you use the hot iron.

Start by cutting your ribbon to the length of your pants and cut pieces of the Stitch Witchery to place between the ribbon and your pants.  Then, cover the ribbon with a towel and place a hot iron on top for 10 seconds (repeat for the ribbon along the length of the pants).  Make sure to check that your ribbon adhered properly along the length of each side.  

That's it!!!  Don't you LOVE no-sew projects?  I know I do, my old pants look so fabulous now and that project took just 20 minutes!

You know I am Head Over Heels, but...


What do you think of this DIY?  Will you give it a try?

What other projects are you up to this weekend? 

I hope the weather improves for everyone across the US, this week has been nasty!  Have a great weekend!

Head Over Heels DIY Friday: Easy Elastic Baby Headbands

Kayd Roy1 Comment
I'm still getting back into the swing of things since our Michigan trip, but after looking through all of our photos I realized I had a cute and SUPER easy DIY project to share...

These cute little headbands I made for my niece!  They're a great baby girl gift idea with a handmade touch!


All you need for this DIY are scissors, sewing thread, sewing needle, elastic and then any type of trim/fabric you want for the decorative element.  I used a sequin bow I found on clearance at JoAnne's and some felt to make flowers from.
You start by cutting the elastic to the right length- and I think typing in "circumference of baby's head" might be the strangest Google phrase I've ever searched.  Anyway, Google told me that for a nine month old the length I would need was about 14-15 inches.  From there all you need to do is stitch the ends of the elastic together, place the decorative element over where the two ends meet (so ends aren't visible when worn), and stitch the decorative element onto the elastic.  Super easy!!! 

I know it's pretty simple but boy, simple and sweet looks so darn cute on this little gal!


The best part of the project was that I really enjoyed making them for her.  I think I was smiling the whole time and kept saying to Alex, "Oh, this is gonna be so cute on her!" I guess since it was a less complicated DIY it also helped to keep it fun and easy to be Head Over Heels for!

Now I want to make her a headband with feather and pearls on it!  Or themed holiday ones!  LOL, I'm envisioning myself 13 years from now still making her things to wear... and I bet she'll say to my sister, "Why does Aunt Carla keep making me tacky things to wear? Do I really have to wear them?"  Ha!

I'll be getting my rear in gear tomorrow and finally painting that dresser. I can't wait to share the color I picked for it!  But before you'll see that I'll have a post FULL of Spring decor ideas from a certain house I think a lot of you love to see :)  It'll be a must see so stop back Sunday for sure! See you then!

Head Over Heels Friday: My Easter Chubby Bunny

Kayd Roy3 Comments
In anticipation of Easter, I decided to make my own Easter Bunny!  In order to do that, I used the cutest, fluffiest critter I know....


Rocco certainly makes a cute chubby bunny right?  Lucky for him the photo session didn't last long.  This sums up what happened....

But before he got his treats, I had to capture his hopping in action...

I know, it's pretty lame but I couldn't resist!  I'm Head Over Heels for this little Easter Bunny!  Are you too?

Hope everyone has a wonderful Easter weekend!

PS- Be sure to enter the $50 Shabby Apple giftcard giveaway in case you missed it yesterday!

Head Over Heels DIY Friday: Scallop Edge/Hem Skirt

Kayd Roy1 Comment
Well, I've been really excited about all the cute spring trends I've been seeing lately... The sad thing is that there's still a foot of snow outside and it was 13 degrees this morning (barf).  If spring does ever get here- and I hope it does pretty dang soon- I know one trend I'm definitely going to shop for are some of these cute scallop edge skirts and shorts!  I'm loving them!!! Super cute, feminine, and fun right?

Since we're still in cabin fever mode I figured why not try to DIY it on this chilly Friday night?!? So, I did just that! Time for a Scallop Edge/Hemmed Edge Tutorial, here we go!

I had an old black skirt from Forever 21 in my closet that I thought I'd give a scallop hem DIY a try on.  I figured if it didn't turn out well I wouldn't be mad at ruining an old skirt that I hadn't been wearing, and better yet maybe I'd wear it after making a fresh alteration! 

I started by removing the existing stitched hem using a seam ripper.  Once all of the hem stitching was removed, with the skirt right-side out I turned up the bottom edge of the skirt about four inches and pressed it with a hot iron.

Then it was time to make a template for the scallops.  I wanted to have three scallops on the front and back so I measured the distance across the front and back and divided by three.  Oddly enough, one of our small pots was the perfect size! I traced the circle edge onto some cardstock and cut out the template. 
I lined up the template with the bottom folded edge of the skirt and traced the scallops with sewing chalk.  Then it was finally time to sew- let me warn you this is the tricky part! It wasn't as easy as I thought it'd be.

I set my machine to the smallest stitch length to ensure the hemmed scallop edge would be crisp when turned right-side out.  Then, all I did was follow the traced chalk lines sewing very carefully and SLOWLY.  It's very important to guide the needle carefully so that your scallops will look consistent and round.
After finishing all the stitching, I cut the excess fabric off leaving 1/8" seam allowance.  The last step was turning that bottom scallop edge right side out and pressing the seams with a hot iron for a clean finished look. 

Here's how it turned out, certainly gave that skirt a whole new look and feel!  Loving the scallops, I need to do a pair of shorts next!


You already know I'm Head Over Heels for the scallop edge trend but are you too? 

What about the scallop hem tutorial?  Will you give it a try?

I'm hoping to actually do some work on my closet/dressing room this weekend.  Hope the weather cooperates because I needs to spray paint some accent furniture for the space...  Stay tuned!

Head Over Heels DIY Friday: St. Patrick's Day Style!

Kayd Roy2 Comments
Good Evenin' Lads and Lassies!!!  Are you feeling the Irish spirit yet?  Obvious I am, so I couldn't think of anything more perfect to share on this Head Over Heels Friday than some of my favorite St. Patrick's Day themed DIY's!  From fashion, to food or pets, you can theme up lots of fun stuff or class up your celebration with a tasting party!  Love it!
St Patty's Pom Pom Shoe Clips via Lovely Indeed  Hat and Beard Photo Props via Etsy-The Manic Moose  Shamrock Shakes via Number 2 Pencil  Beer Tasting Party Decor via Design Sponge  St Patrick's Dog Bow Collars via Love Maegan Lucky Clover Coin Bags via One Charming Party 

Ummm, who else wants to make giant green Pom Pom Shoe Clips for Sunday?!?  I know I do!  I also need to make Rocco and Sadie some green attire- they are too cute to get pinched!  Aside from what I want to make, I actually did one of these DIY's today at work! We made our own Shamrock Shakes and they were a hit!  Super easy too, highly recommend if you need a fun St. Patty's day treat (and don't want to hit a McDonalds)!

Which idea are you Head Over Heels for?
Do you have any other DIY favorites for St. Patrick's Day?

If you are out guzzling celebrating with some Irish styled green beer this weekend, be safe!  Have a great weekend everybody!

Head Over Heels DIY Friday: Hand Cut Chinese Paper Wall Art

Kayd Roy4 Comments
Remember a while back when I shared some of my Decor Finds from China and India?  Well, I finally figured out how to take these handmade Chinese paper cuttings and turn them into a beautiful home decor piece!  So what did I create???

This double layered glass wall art piece!
Thank you again Sunny for the nice gift from Shanghai!
All I got to make this was a double layer glass frame from Home Goods and some thin/wide woven burlap. I placed the burlap between the glass then took each paper cutting out of the booklet and placed them on the burlap.  Easy-peasy! 

I love how the double layered glass allows the hand cut paper to create shadows on the wall behind.  It adds a lot of dimension and interest, just feels like a special way to display this handmade art.  I also realized while arranging the cut papers that they seem to tell a story or set a scene maybe?
All of the characters in my little booklet were rabbits and they were dancing or playing instruments.  They all look so happy, like they are at a big party or something?  I think my favorite hand cut character is that little rabbit with the Chinese symbols (above left photo, bottom right corner).  He looks like he is laughing right?  It's so cute and fun!  I guess it is open to interpretation though as most art is! 

I know I am Head Over Heels though, especially when I discovered the story/scene!

Now, I still need to figure out what to do with this 16" x 24" tapestry I got from the Delhi Haat Market in India .  I just love how authentic and worn it feels, it's a perfect well travelled find right?!  I want to do something more creative than just framing it since it is fabric, but I'm kinda stumped for ideas still.  I know I don't want to sew it onto anything either... 
... hmmm.  Anyone have a fantastically creative idea for this tapestry?!?!  I'd love some help on this one, it's just been sitting folded up in my closet since my trip (sad).

Speaking of my closet, I'll be working on that this weekend and plan to share my first progress pics on Sunday/Monday!  See ya then, have a great weekend!

If you want to see my China & India Trip Photos click here for 2012 and here for my 2013 trip!