Carla Like It Is

Some (DIY) Valentine's Day Whoopie!

Carla Zidarevich2 Comments

Have you ever wonder what it would be like if we exchanged Valentine's and candy at work with co-workers like we did in elementary school with our classmates?  You're probably thinking, "Ewww. Weird," but I'm only asking the because believe it or not, I got to have that very experience this week when my teammates (with the idea led by Lauren of Laurel Rose Design!) agreed to the idea of a throwback old-school style Valentine's celebration complete with "mailboxes" to deliver the Valentines at each of our desks.  Sure this all sounds very silly for a bunch of serious corporate professionals but... 

What do you think happened when said 'serious corporate professionals' had to make and pass out Valentine's to their peers? 

Well before I can answer that, I need to share the precious DIY Valentine that I came up with, behold!

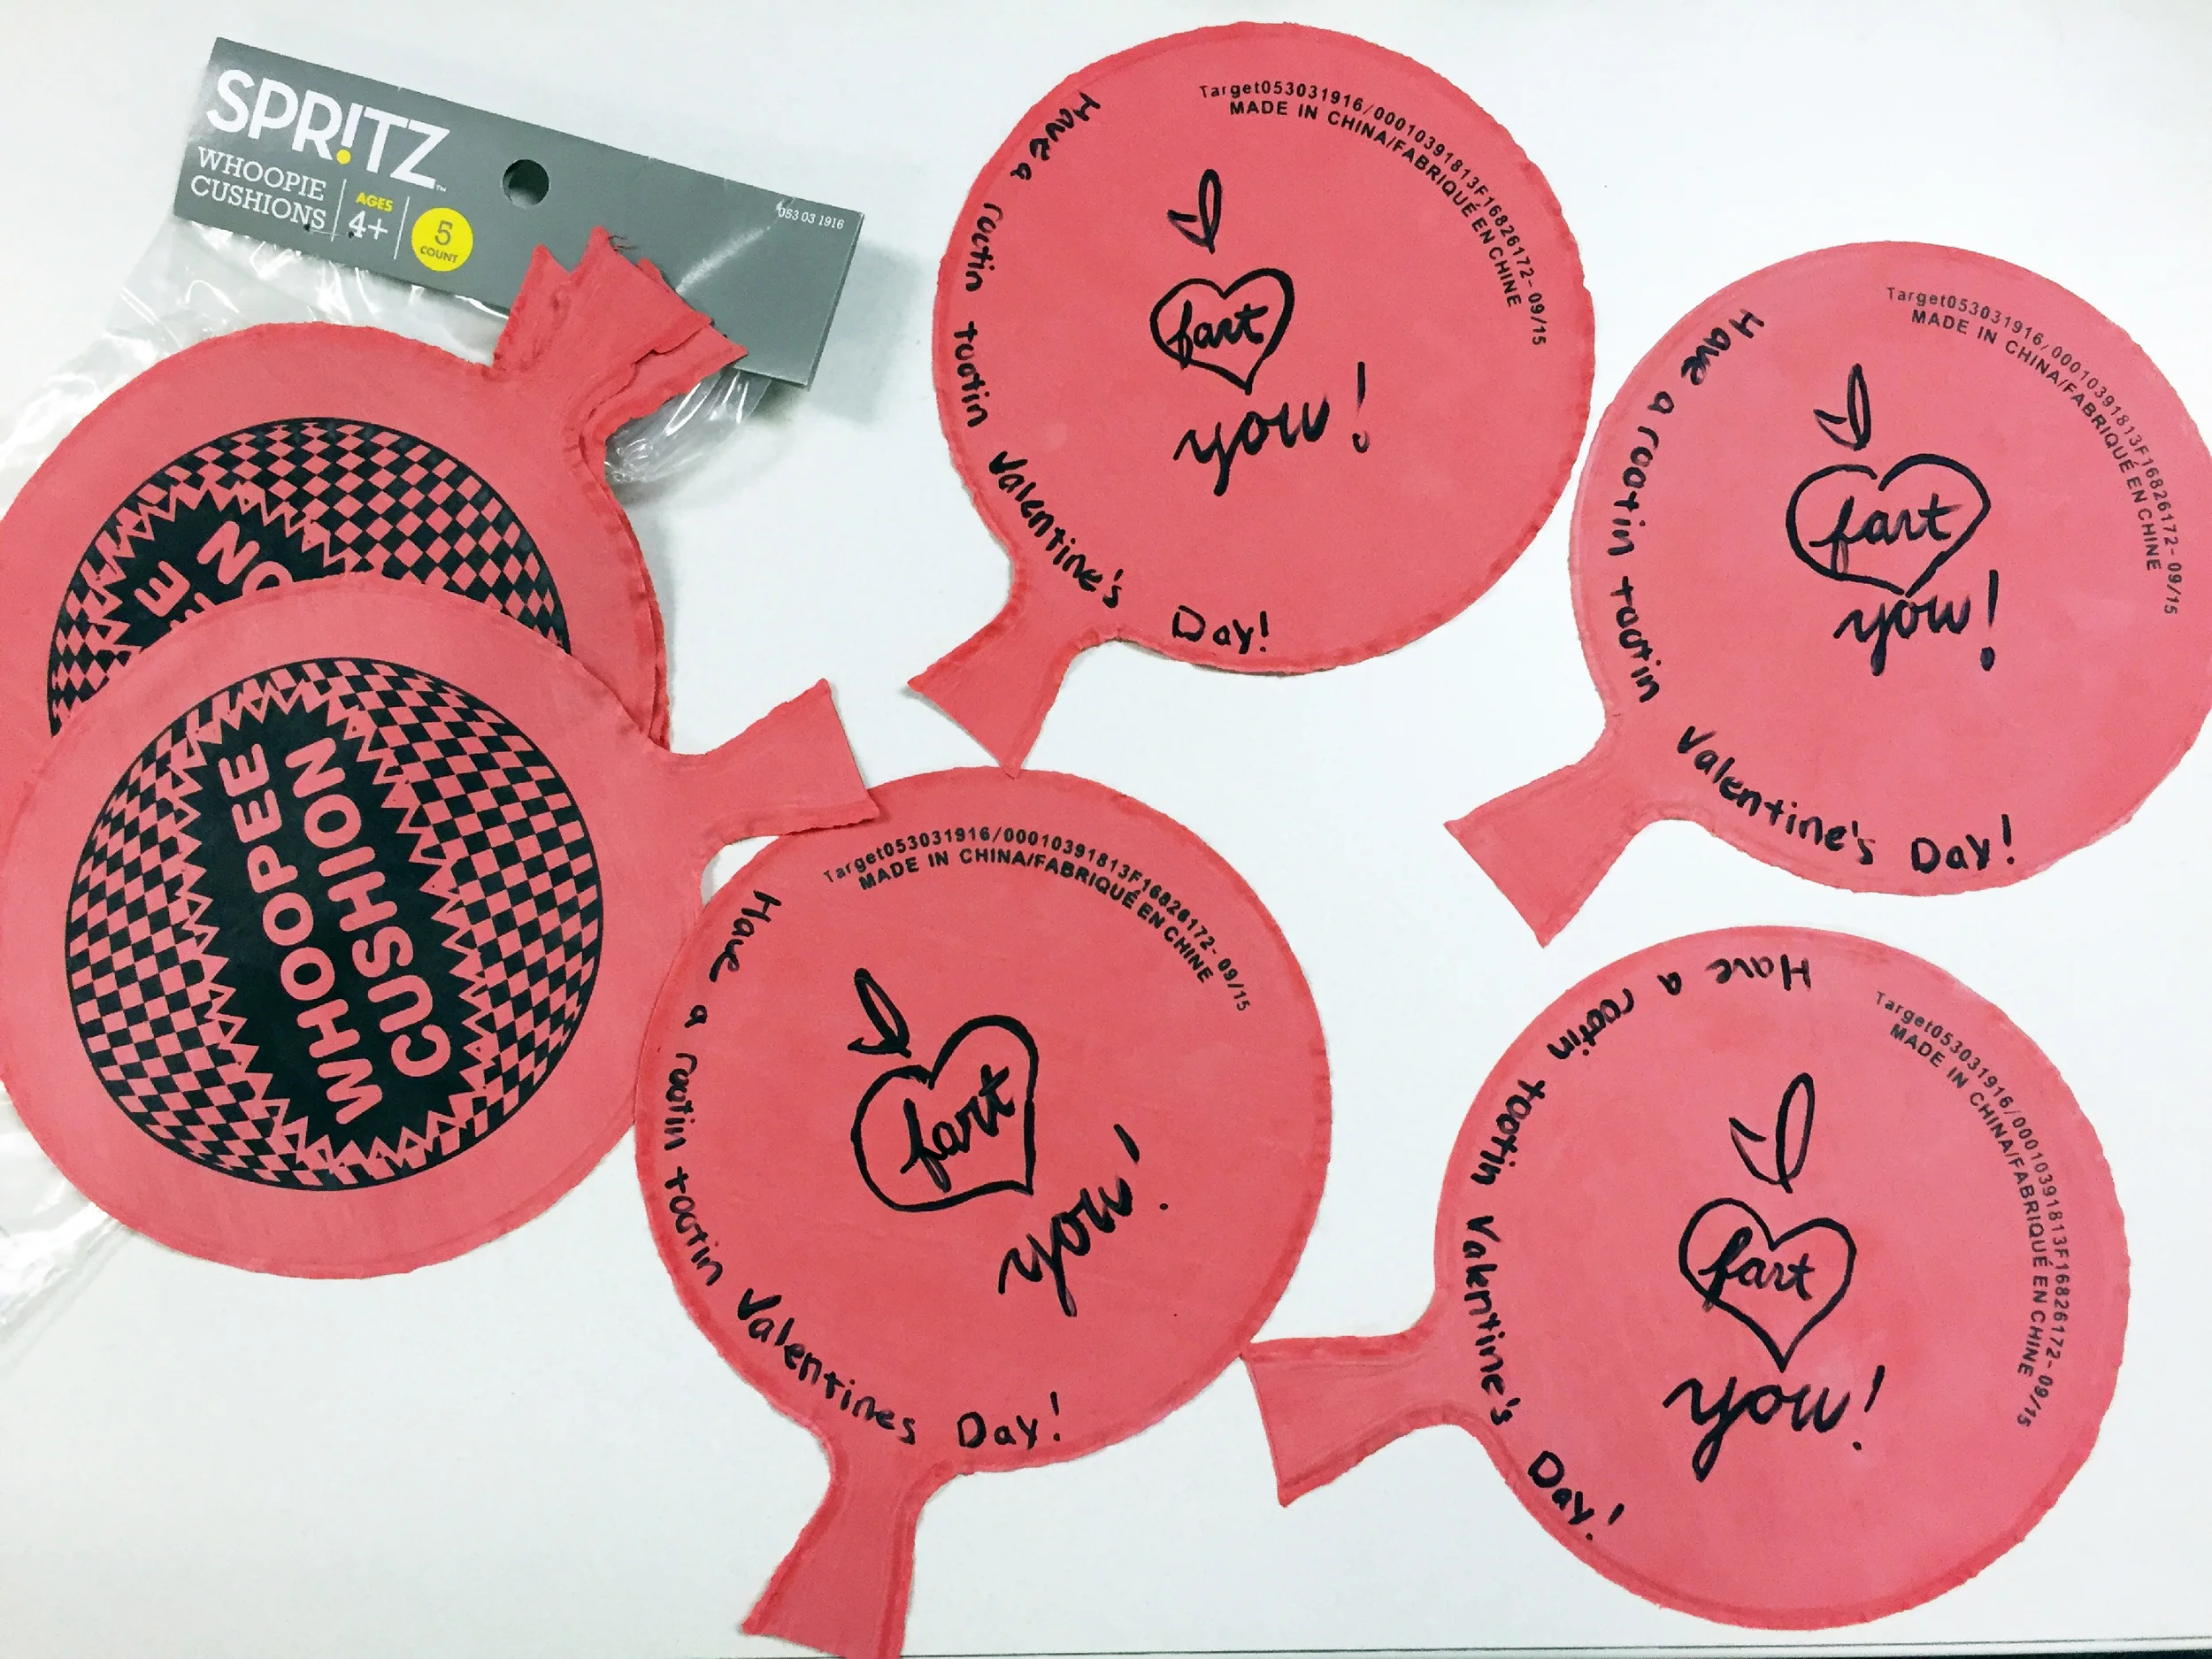
WHOOPIE CUSHIONS!  GENIUS!  YES! .... 

Who doesn't love the simple playfulness of a little Whoopie?!  That and/or perhaps my brain is wired to go to fart jokes?!  Could very well be true :)

Since this was a work thing, I didn't want my DIY Valentine to take too long to put together because after all, I did have a lot of a lot of actual work to get done ;)  I thought it's got to be something fun that I could write on and the message could be something Valentines-y themed but still funny/cheeky (work appropriate still of course!).  I also then remembered that Target sells 5 packs of Whoopie Cushions in their Spritz party/entertaining aisle for $5 so I swung into Target and grabbed a few!

After that, I just grabbed a plain old black Sharpie and started writing the most perfect Valentine's Day message that could ever be written on a Whoopie Cushion...

"I fart you" with the word fart inside a heart, then "Have a rootin' tootin' Valentine's Day!"

"I fart you" with the word fart inside a heart, then "Have a rootin' tootin' Valentine's Day!"

So what happened when we all came together to pass out our Valentine's card creations?  Much to everyone's surprise and delight, we ended up with some of the most creative, HUMOROUS, surprising, and uniquely designed Valentine's that I've ever seen!   Each card had a personal wink unique to the individual that made them giving even the simplest card (like a Whoopie Cushion with fart jokes written on it with a black Sharpie) a very thoughtful touch ;)  

A look at what I found inside my Valentine "mailbox", so many fun little surprises!

A look at what I found inside my Valentine "mailbox", so many fun little surprises!

Lastly and most importantly, I also have to say that I appreciated the fact that this little throwback V-day celebration gave us a moment to pause and laugh together as a team.  I think all 'serious corporate professionals' need more of that! 

Now I'd love to know - what did YOU think?

Do you fart (heart) my Valentine's DIY creation?  

Would you want to try a fun throwback Valentine's card exchange at your office too?

"What's Behind the Red Door?"

Carla ZidarevichComment

Intriguing question isn't it?  And believe it or not, those 5 simple words was all it took to convince me that- Yes. The basement door should be red.  Why red?  Why not?!  

Image via Apartment Therapy.  Paint color for door: Behr Flirt Alert

Image via Apartment Therapy.  Paint color for door: Behr Flirt Alert

This door makeover was one of the little last minute "Project-Palooza" house projects we had on our to-do list that needed to be completed in time for scheduled photo session for the Apartment Therapy Home Tour feature.   

50 shades of black, white + boring. Nothing memorable about this look.  

50 shades of black, white + boring. Nothing memorable about this look.  

I know it does seem random but knowing that our entire house would be photographed, we both were evaluating the spaces in our house thinking about what might end up in the feature and at some point Alex frowned and asked, "Do you think she'll take photos of the hallway by the basement?"  Pointing out that the hallway space between the kitchen and back entryway was pretty black, white, beige, boring and bland.... blah.     

Then he said, "We should paint the door red.  That space needs some color AND it's kind of fun because the basement door will be 'the red door' in our house, with the 'what's behind the red door' feel."   

What a curious and fun little premise...  That along with the fact that our basement is unfinished and probably never will be - made a red door that signifies the difference from the other livable spaces in our home, a purposeful and thoughtful design change. LET'S DO IT!!!

So, off to Home Depot we went to pick up paint!  We both figured a basic, bold bright red was all we needed so without being too picky, Alex decided on Behr's Flirt Alert as the red paint color for our door.  Once we got home, Alex dove right into sanding and painting action (shown above)!

The 'moral of the story'?  Well, it's sort of the same learning that I mentioned in my last post about the plain white vintage chenille bedspread that I dyed indigo... It's amazing how much impact a simple color change can have! 

Add a hand sketched Llama too?!  Even better with the red door!

Add a hand sketched Llama too?!  Even better with the red door!

Another HUGE plus-  depending on the time of day and amount of sunlight, the reflection of the red paint color can make the tone of our white/beige walls shift, appearing more gray and cool on cloudy/overcast days and then more peachy and warm on sunny days.  So if the color of the door alone didn't swoon you, that part sure as heck should!

It's honestly pretty dang cool, I never knew my hallway could have moon ring powers!  So I have to ask...

Don't you want one now too?!  (LOL.)

But seriously, let me know if you do and if you're thinking of giving a door or something else in your home a POP of color!  I've been in contact with 3 ladies that decided to try the dyed bedspread project from last week for themselves- So awesome!  I'd love to hear more so don't be shy, give me all the deets!  Have a cozy weekend everyone!

Project! My Indigo Dyed Bedspread

Carla Zidarevich7 Comments

Did you happen to notice that beautiful, richly colored chenille bedspread from our guest room that was included in our Apartment Therapy Home Tour photos?   

Fun, funky, surprising and lovely all at the same time right? 

Would you have guessed that it is the same bedspread as the one shown below?  It looks sweet but there's just this sort of, icky and old cottage-y kind of vibe to it, right?  Funny. It's just the simple change of color that completely renews the style of this old bedspread for a more modern appeal, who knew?!

The bedspread before my DIY indigo dye project, this tired look needed a modern update or it had to go!

The bedspread before my DIY indigo dye project, this tired look needed a modern update or it had to go!

Years ago I had picked up the bedspread at a thrift store for just $8.00.  It reminded me of a bedspread that my grandma had and being the sentimental weirdo that I am, I just had to take it home.  Sadly, the problem with using the bedspread in our home was in that statement alone- it just looked too grandma-esque for us.  

Reluctantly, I folded it up and stored it in our linen cabinet...for about 5 years.  Then on a random day last fall, my co-workers, Jeff and Natalie, brought in an old patchwork quilt that they had dyed a dark indigo blue color.  It looked so fresh and new but still maintained its handmade charm and worn details, it was the perfect balance.  I loved it, I wanted it, but I couldn't have it.  Then it dawned on me- I COULD DYE THAT OLD CHENILLE BEDSPREAD BURIED IN THE CLOSET!!!!!!!  

The updated indigo version totally revives the look and still keeps it's familiar charm.  I'm still in love with the results of this DIY project- and it was so easy too!  Here's how I dyed that old bedspread using:

  • 2 bottles of Rit Dye
  • Vinegar
  • Table Salt
  • 8 Gallon Plastic Bucket
  • Rubber gloves (highly recommended!)

I brought the items listed above along with the bedspread down into our scary old basement and used our messy old utility sink as my space for the project.  I figured that would be best to avoid permanently staining or dyeing any of our sinks or our washing machine-  I know that is what is instructed on the Rit Dye bottle but I still don't trust it!  I'd rather just play it safe and use one of our large plastic buckets for the dye bath!


Other than that, I followed the instructions that were listed on the bottle for the most part, but I can say that I HAD to dye it, wash it, dry it, and then do it all one more time to get the deep rich color.  So if you are giving it a try too, be sure to plan on dyeing it TWO TIMES!

I began by filling the 8 gallon bucket with hot water and submerging the bedspread into the hot water making sure it was completely and evenly saturated.  Then, with the wet bedspread removed from the bucket, I added the table salt, vinegar, and bottle of Rit Dye to the hot water.  After stirring the mixture around a little bit, I VERY CAREFULLY plopped the wet, soggy bedspread back in the dye bath (bucket).

Once the soaked bedspread was fully re-submerged into the dye bath, it was time to SLOWLY move, rotate, agitate, massage, etc. the bedspread in the dye. NOTE: whatever you want to call the "moves", I made sure to "move" it very carefully and slowly because if that dye splashed anywhere else, I knew it was not likely to come off anytime soon ;)  

I wanted to be sure that the bedspread ended up with a rich, even color, so I guess you could say that I overdid it, making sure that every little nook and cranny was absolutely sure to soak in the dyed color.

I let it soak in the dye bath for an 1 hour before going back for another round of moving and grooving, followed by another hour of soaking.  Afterward, I pulled the dyed bedspread out of the dye bath, rang it out by hand, and let it hang/drip dry in our basement for a couple days. Once it was dry I put it through a heavy duty wash cycle in our washing machine and again let it air dry.

After all of that, once the bedspread was completely dry, the color just wasn't as rich and saturated as I had hoped. So I did it all again. Every step, one more time-  YES, say it with me... ONE. MORE. TIME!

After the second go-round, the color had deepened significantly and the bedspread appeared just the way I had envisioned it from the start!   SUCCESS!!!

What do you think of this DIY dye project?  Were you surprised at the difference the color made too?

Are you dyeing to dye something of your own to give it a new feel?  If so, what is it?!

I know I was inspired by Jeff and Natalie to tackle this project, so I'd love to know if the inspiration rubbed off on you too!  


Apartment Therapy Home Tour Feature! (Who- Me?! YES!!!!)

Carla Zidarevich1 Comment

Have you heard the big, HUGE, crazy exciting news?!!  I hope you might have because it's not exactly new news anymore (I know, my blogging groove is still on the slow side)- Alex and I got the most amazing surprise on Christmas Day to see our home tour featured on Apartment Therapy!  

Fun fact: Rocco unfortunately projectile vomited seconds after we welcomed the photographer into our home- How's that for an introduction? LOL!

Fun fact: Rocco unfortunately projectile vomited seconds after we welcomed the photographer into our home- How's that for an introduction? LOL!

I wanted to write up a blog post to share the news that very day but considering it was Christmas Day and all, that idea quickly flew out the window ;) I was too busy soaking up some much needed family time back in Michigan... and I may have been in a food coma/nap for a good chunk of the evening that day.  Tis' my kind of holly+jolly!

Here's are just a few of my favorite pics but if you'd like to see them all (and there are a lot of beautiful pics to see!) just click here and it will take you to the Apartment Therapy feature.

What was the best part of the experience?  It was actually something that the photographer, Emma of Frost on Flower, had mentioned to us as she was taking photos- "You get to see your house from a new perspective or through a new pair of eyes; just in a new way you may have not seen it before."  And she was TOTALLY right!  

As I laid eyes on the article and photos for the very first time on Christmas day, I saw parts of my home that I had never thought were beautiful or interesting and they looked completely new, different, and incredibly stunning to me... Or there were spaces that I had taken photos of multiple, perhaps a hundred times when covering projects to share our blog, but she captured it a different way or from a different angle that made me fall in love with it for all new reasons.  *sigh* That epic 'true love' feeling is the best isn't it?! 

What did you think of our home tour?  Any favorites or surprises?

Want to know more about how it all happened?  Let me know!

Lastly I wanted to say something for all of you home DIY-er's out there- It took us nearly 7 years to get here, any "fixer-upper" type home that needs work honestly takes years of work to get it there, ESPECIALLY if it's an older home.  Even now, we know ours isn't perfect (we're normal and work off our budget $ like most do) but we understand that the good stuff, or getting to the good stuff, takes a while!  So if you're in the THICK of it, don't get discouraged ;)  You'll get to that epic 'true love' feeling too!

Thank you Emma for capturing our home so beautifully!  Your photos made us feel incredibly proud of our home and the work we've done to make it our own!

The Spirit of the Holidays

Carla ZidarevichComment

It's that feeling you get when you see the warm glow of a Christmas Tree in the heart of your home.... 

That feeling is the spirit of the holidays.  It's warm, cozy, comforting, peaceful, cheerful and happy-  I wanted to share that feeling today.

No matter how you decorate it, it's too good not to share.  

With much happiness, we wish everyone a joyful and peaceful holiday season.

How did you make your tree feel special this year?

Where do you find that "holiday spirit" feeling this time of year?

Project-Palooza

Carla ZidarevichComment

Holy crap!  Are we almost done with November?  The month seemed to go by at a wicked fast pace but that could be partly because Alex and I have been crazy busy with a bunch of random projects at the house-  I like to call it "Project-Palooza"  (because it makes it sound like a super-duper fun thing right?! ).  Here's a quick snapshot of all the fun in progress :)

Some of the items on our list (not all)- Dyeing a vintage bedspread, a new refrigerator (!!!), tiling AND painting our mini-bathroom, a mirror DIY update on our coffee table, sanding/ refinishing/ repainting wood trim, painting chairs from Bauer Bro…

Some of the items on our list (not all)- Dyeing a vintage bedspread, a new refrigerator (!!!), tiling AND painting our mini-bathroom, a mirror DIY update on our coffee table, sanding/ refinishing/ repainting wood trim, painting chairs from Bauer Brothers Salvage, new light fixtures, painting our basement door red (why the hell not?), and lastly getting our 2015 Christmas tree decorated AND all the holiday decor that goes with.

Why are we palooza-ing ourselves?  

Partly because we want our house in order before the holidays but mostly because my wonderful handy husband is going to have surgery on Tuesday (wa-wa).  It's a complicated one to explain but we just know that Alex won't be his handy-self for a couple months while he's recovering.  Send good vibes/thoughts/prayers his way :)

Can't wait to tell you about each and every project (hallelujah for that fancy new fridge!).  More to come soon!  

Intrigued by any of the projects listed? Which ones?!

Fall Fashion 5

Carla ZidarevichComment

It happens every fall.... and spring for that matter too.  The seasons change and I start becoming slightly OR completely clueless when it comes to fashion.  It's something I like to call "Seasonal Fashion Confusion".  Do you know that feeling too?!  Symptoms include:

  • Wasting 20+ minutes in your closet trying to pull together a sensible ensemble
  • Tearing apart your closet (and I mean a wicked, wicked mess)
  • Wearing old worn out shizz that you should have thrown out last fall
  • (Worst of all) Sporting summer attire when the temps really suggest that you should not.  Example: If it is 40 degrees Fahrenheit in the morning, then just say NO to flip flops.

The symptoms make you feel so, so, so shameful!  It usually takes a couple weeks to get out of my fashion rut once I begin to see more and more fall fashion start to play out in magazines, out shopping, or on Pinterest.  After a while I'll end up noticing a pattern for what I'm most drawn to (because not every trend is for everyone).  Then wha-la!  Back to feeling more me, happily styled and seasonally appropriate :)

Now I know that was a lot of mumbo-jumbo to get to the point (sorry!) so here it is- My favorite fall "trends" along with my take on how to sport them...

My Fall Fashion 5

5 fall fashion pieces every gal needs!

5 fall fashion pieces every gal needs!

#1 Capes, Ponchos, Oversized Scarves, etc.

This is a BIG one.  I know it's my favorite fall trend and I think it's sure to be a favorite for EVERY woman out there.  With the temps falling, who doesn't like feeling cozy?  Better yet, how easy is it to throw on a plain/basic ensemble (think jeans and a tee OR an all black ensemble) and then drape a beautifully patterned cape, poncho or oversized scarf around you?  This fall it seems like anything goes, you may as well sport your favorite throw blanket, LOL!  Hey, as long as it's a beautiful textile I say fair game :)

#2 Wide Leg Trousers + Culottes

Get ready.  It's coming and it can't be avoided- WIDE LEGS.  It's hard to think that the days of skinny jeans and leggings may be coming to an end, hell even more unbelievable is the thought of JNCO jeans...  Thoughts of 7th and 8th grade flood my mind * shutter * but the comeback is true!  The first big wave of this look is in the form of wide leg trousers and culottes, and honestly, the look feels so refreshing after so many years of skin-tight pants- and can I add that leggings are NOT pants!  Anyone else tired of seeing underwear that is clearly visible? Put on REAL pants people!  - End rant -  I've been pairing both trousers and culottes with a well tailored or fitted top, super easy and chic!

#3 Footwear Block-Out

From the block heel to color blocking and well, just plain making your feet look like a pair of blocks.  I summed up my thoughts on fall footwear as a total "Block-Out".  The benefit of this block-out though is that even the flats will give shorties like me some height thanks to the thick lug soles!  A fun spin on classic Chelsea style boots, I've added these to my shopping list!  I'm also dying for the color blocked heeled booties to start trickling down from the runways into the real world stores within my budget, I'll let you know when I get my hands on some!

#4 Fringed Knits

Forget the same leather/suede fringe looks you remember seeing the last time fringe-y stuff was trendy.  A purse with 5 feet of fringe hanging from it?  BORING.  And honestly, who really needs that?  I mean you're just bound to drag it through poo or ketchup or something. - End rant - What I'm loving when it comes to fringe are these loose-end sweater knits.  Totally knew take on fringe.... and less likely to end up in that whole poo/ketchup scenario :)  Whether it's intentional fringed as it's being knit or deconstructed fringe from an old knit, love this look.

#5 Satchel Up

I think my husband said it best, "Why do you need to carry around such a huge bag of sh*t all the time?"  My response, "I HAVE to carry all this sh*t all the time, it's stuff I NEED!"  But really, did I?  I hadn't really thought about it and as it turns out- No.  I really didn't need to carry around a notebook, extra shoes, laptop, box of Triscuits, wheel of brie, encyclopedia Britannica set, etc. (kidding with those 3 items... sort of).  I had gotten so used to hauling around so much random crap everywhere, everyday that I convinced myself that only kind of handbag I would need was one large enough for me to fit inside of.  WTF?!  I imagine I am not the only woman guilty of this, so satchel up with me ladies :)  Small handles to carry or rest on your forearm, the ultimate in convenience cross-body strap, 6-8" or 12" LxH at most in size.  A simple satchel style handbag is all we really need. * sigh * In written form, Alex you were right.

There you have it, fall fashion flushed through Quirk Madame style.  Ketchup, encyclopedias, thoughts of scary Jnco's and all!  Now I need something from YOU!  I'd love to know....

What is your favorite fall trend/look this year?

Are there any other fashion topics you'd be interested in seeing me write about?

Shameless plug for feedback: It's my first real dive into writing about fashion style stuff, so I'd love to know if you enjoyed it and/or if there are other things you are interested in?  I did have a lot of fun writing it so I'd love to do more if you're liking it too!  Please let me know!

Rapid City Rundown

Carla Zidarevich2 Comments

Ready for all the insider deets from our stop through Rapid City South Dakota?  OF COURSE you are, right?!  I mean, it's one of the nation's top travel designations after all :) and yes, I couldn't help but say that with a dash of sarcasm because South Dakota isn't known for being very glamorous or anything but there's honestly a crap load of stuff to do and see there- is all of it worth it? Yes and no, all I can give you info on is what we decided to see and do during our stop through Rapid City on the big haul to Yellowstone.   

Mountain with faces on it, check.  Charming mountainside town, check. Haunted hotel stay, check.  Face to face with huge Bison on a state highway (pee your pants kind of close) , check. Ahem, here it goes...

First glimpse of Mt Rushmore from the road.

First glimpse of Mt Rushmore from the road.

Mount Rushmore.  You can't go to Rapid City without visiting Mount Rushmore, it's the #1 tourist to-do.  Every American has seen the photos and can picture exactly what it looks like and yes, it is just like that when you park your vehicle and enter the National Park grounds.  

What I found to be more special is the swirling mountain climb drive on the way to the National Park entrance.  It looks like your basic tall mountains in the distance until you catch your first glance of those famous faces on the tallest mountain peak.  

Seen from that distance, it really is an incredible thing to marvel at.  So much detail went into making those recognizable faces. 

For anyone visiting the park, we recommend doing the Presidential Trail loop to get an up close view of Mount Rushmore- Be sure to start on the left side!  If you go to the right side you will endure some serious stairs.

Left photo taken from the President's Trail looking up. Right photo at Park entrance.

Left photo taken from the President's Trail looking up. Right photo at Park entrance.

Keystone, SD.  Just down the mountain from Mount Rushmore sits a charming little mountainside town called Keystone, that's definitely worth a stop!  There are plenty of shops, restaurants, bars and all sorts of delightfully cheesy family fun type things like old-time photo souvenirs and even an alpine slide (that closes after Labor Day- not gonna lie, I was a little bit crushed).

Keystone South Dakota visit-01.jpg

We strolled down the main street and decided to pop into the Ruby House Saloon for a couple bloody mary's.

Reflection photo while waiting for our bloody mary's.

Reflection photo while waiting for our bloody mary's.

Fantastic bloodies, highly recommend!  The people watching was pretty amazing, so, so, so many bikers and biker outfits :)

"Is that rock giving us the finger?"

"Is that rock giving us the finger?"

Custer State Park.  The next to-do on our list was a visit to Custer State Park.  The park is a world class wildlife refuge and also recognized as one of the top ten wildlife destinations in the world.  I was beyond excited to get up close and personal with the prarie wildlife which included bison, deer, antelope, mountain goats, coyotes, burros, bighorn sheep, birds, wild turkeys and the oh-so adorable prarie dogs.

Something I was not ready for was the drive on Highway 16 through the park, 17 miles FULL of switchbacks.  The truck felt like a tilt-a-whirl.  

For a while there, my fantastic bloody mary was not feeling so fantastic anymore.  All that tomato juice, olives and pickles just tilt-a-whirling in my tummy.  Blah!

Maybe that rock by the park entrance was was some sort of sign warning us of the crazy drive ahead?  I couldn't help but think that it looked like it was giving us the finger- it does doesn't it?!

After tons of winding and tilt-a-whirling around the rocky roads, we reached the wide open grassy prairie lands of the park and were greeted by clusters of wildlife all over the place- at last!  We both had a hoot of a time with the burros.

They were not shy at all,  just strolled right on up to our truck and stuck their heads in our windows.  I think they were looking for some road trip food but all we did was pet them, they walked away pretty quickly.  Sorry buddy, no Combos for you!

The most interesting part of our Custer State Park visit was the encounter we had with an EXTREMELY stubborn bison that just wouldn't budge from his stance on the road.  We drove up slowly wondering if he'd take the hint and move along but no.  

This bison moves for no one.   

This bison moves for no one.   

We patiently waited, took photos, a video, and then just continued to wait.  With cars lining up behind us we signaled to the driver in the opposite lane and they stopped to let us by.  That's when that whole 'pee-your-pants scary in your face GIANT bison' moment occurred.  Alex kept saying, "get a photo!  take a photo!!!  hurry!" and that is when I took the photo on the right shown above.  It may not appear like we were close but I was only about 4 feet away from that massive creature and it was looking at me dead in the eyes.  Thrilling Custer State Park experience achieved. 

Downtown Rapid City, SD.  After our long day of sightseeing, we drove back to downtown Rapid City where our hotel was located.  We had a casual dinner and then did some wandering which was when we stumbled upon "Graffiti Alley".

There's some pretty incredible artwork all along the alleyway, providing a great backdrop for an excellent evening stroll.  

We crashed at the Alex Johnson Hotel, perfect mix of history and modern luxury.  The main lobby was filled with traditional and authentic Native American decor and the most beautiful hand painted patterned ceiling- couldn't help but stare at it every time we walked through!  Another interesting part of the hotel's history are the hauntings.  

The historic "Hotel Alex Johnson" sign lit up at night, the patterned ceiling, and Alex packing up the truck before hitting the road for Wyoming.

The historic "Hotel Alex Johnson" sign lit up at night, the patterned ceiling, and Alex packing up the truck before hitting the road for Wyoming.

There are many reports of  significant paranormal activity throughout the hotel-  I can honestly say I was completely creeped out while waiting in the hallway by our room door because our card key wasn't working- multiple doors locking up and down the hallway followed by the sounds of rattling doorknobs as if who ever (or whatever) locked them was checking that they were locked.  Not made up. Insanely eerie.  

The next day Alex packed up the truck and we geared up for another full day in the truck.   

This was my FAVORITE day of driving from our entire trip, so much so that I couldn't stop myself from making this overly-dramatic "movie trailer" from one of those iMovie templates.  It's super cheesy, please enjoy :)

Next stop- Jackson Hole, the Teton Mountains and Yellowstone, followed by the Badlands camping finale!  Stay tuned!  

Porter Sculpture Park- Our Favorite Roadside Stop

Carla ZidarevichComment

One of the best parts of a road trip is being able to stop at any of the numerous little fun (or odd) roadside attractions along the way. And believe us, there are plenty from Minneapolis to Yellowstone.  We saw the good, the bad, and the "why the F did we waste our time" type places :) But out of all of them, we had one clear favorite and it was actually the very first stop we took during the entire trip- Porter Sculpture Park.

To be honest, I hadn't planned to feature a whole blog post about the sculpture park but there was just something about it that really spoke to me. You see, this park has just the right mix of delightfully odd humor, and heartfelt authenticity that I was longing for.  When I began looking back through my photos, I could feel the same dream-like whimsy I felt when I was walking through the park and wanted to be able to share some of what that experience was like.  So I hope you enjoy them as well!

A feeling we can all relate too right?!

A feeling we can all relate too right?!

Located about 25 miles west of Sioux Falls, SD, in Montrose, this roadside attraction is hard to miss.  Anyone driving along I-90 can see the 60 foot tall metal bull horns reaching up toward the sky from the slightly rolling prairie grasslands, something that caught our eyes and curiosity instantly.  Alex and I knew we had to stop and check it out.

Porter Sculpture Park as viewed from I90.

Porter Sculpture Park as viewed from I90.

The Park is the creation of metal sculptor Wayne Porter and features over 40 recycled metal sculptures on a 10 acre property where he used to raise sheep.  "His pieces are majestic, whimsical, and thought provoking" and "readily display the influence of the South Dakota prairies that he grew up on, reflecting his quick wit, humor, and diverse interests."  

porter sculpture park South Dakota-01.jpg

Porter keeps the overall set up very simple, quite spartan like, so don't expect a big fancy building for paying an admission fee or an unnecessary guide brochure... 

What you will find is Wayne Porter (and know he may or may not be sporting holographic comical glasses... or whatever else captures his creativity that day!), and his very friendly dog.  He enjoys being there everyday to greet and meet each person that stops to see his whimsical creations.  For me, I thought that part alone was pretty special because it isn't very often that you can meet the artist, ask questions, give praise, or discuss a piece in particular after reviewing their work.  Pretty dang cool.

Ballerina- My favorite sculpture and story from the park.

Ballerina- My favorite sculpture and story from the park.

Overall, I took from it what any person should take/feel while visiting an art exhibit- it captured my imagination, I was immersed, I felt it.  I showered with the fishes and happily danced with the free spirited flower ladies.  You should too. 

So should you ever be on I90 in South Dakota someday looking for a brief roadside escape break, I highly recommend stopping at Porter Sculpture Park (Facebook page link here)... And if you need to choose between that and "the world famous" Corn Palace, trust us and stop at the Porter Sculpture Park!  Now, not dogging the Corn Palace, but there isn't much of an experience at the Corn Palace, it's a auditorium/basketball court/gym inside.  Over-rated is an understatement, we felt a bit cheated for taking the time to stop there- Please don't hate me residents of Mitchell, SD, I'm just being honest :)

Lastly, if you end up with our kind of luck and your vehicle won't start, Wayne Porter will happily give your vehicle a jump so you can get back on your way :)  

PS- that was the one and only time our truck didn't start on our entire trip, funny enough it was at our very first stop right?!?  (at the time I did NOT think it was funny whatsoever! Thankfully never happened again!)  

Stay tuned for more!  We're just into the good stuff!  Lots more road trip fun and a grand video montage I've been working on!  Ready to share some of the most embarrassing but funny shit from the road! You won't be disappointed, haha!  

Return of the Road Trip

Carla ZidarevichComment

Well hello there!  I can hardly contain my excitement right now because it's my FIRST Quirk Madame blog post ever!  Woot-woot!  Totally worthy of a mini (imaginary) celebration just for that part alone but for me, I guess I'm more so celebrating the fact that I'm getting back into my storytelling groove which I've really been missing, so man it feels good... Do you feel it?  And I mean FEEL it?!  You better be, because what better way to kick things off than with a road trip tale, right?

Now, before I can tell you all about our amazing road trip (and for those that follow my Instagram you got to see some of the amazing-ness already!), I'll back up a bit and explain where this whole road trip idea began.

A road trip?  Why?  Where to?  Won't sitting in a car get smelly? Etc.

Earlier this Spring Alex ditched his sedan for a truck- and not just any truck, Alex decided on a shiny burnt orange 1979 Chevy C10.  It was very unique, in good shape, and most importantly it was something that Alex could tinker with :)  Within a couple months Alex had "rebuilt most of the motor to improve power, fuel economy, adjustability, and reliability," and we took a few weekend day drives out to some of the lakes so I got to experience riding along in the truck cab.  I liked the fun old school bench seat, loud engine, and most of all LOVED sitting on the tailgate for picnic lunches in the sun by the lake.  The typical car ride experience was totally different in this old truck, it was an experience on it's own and I was totally charmed by it!  An old truck from the seventies, who knew?

When it came time to think about a summer vacation we both actually thought that the truck would be perfect for a road trip- something we've actually never really done together surprisingly (our 1,000 drives to and from Michigan don't count - not much adventure to a often repeated route really).   There was just something about the road trip idea that felt very freeing and relaxed compared to the idea of our last two big Europe vacations that took more time planning for than the actual trips did.  Along with that, we both have been traveling for work (something we both feel very fortunate and thankful for!) so we felt like we've had enough time spent at airports for the year- Really, who enjoys the whole airport experience? If you do, you are weird, capital W weird.  So a vacation that involved ZERO airport travel fiascos?!  YES.

IMG_3035.PNG

With the trip idea chats well underway, Alex suggested that we drive the truck out west and keep it old school style- camping, road maps, national parks, emergency gear, hiking, etc.  The whole idea was too good to pass up!  Alex was amped about getting his old truck out on the open road and all the way to the mountains.  I was just amped about the whole old school style road trip idea, there was kind of a whole look and theme I pictured in my mind and it looked real, real GOOD.  Fringe boots, big floppy hats, crochet rompers, big wooly sweaters, and cheesy hats kind of good if ya know what I mean?!

After a lot of planning, packing, and extra work Alex did on the truck to ensure it'd make it all the way to Yellowstone and back, we finally hit the road!    Our adventure began and  it was all up to US- no airports, flight delays, connections, online check-ins and seat selections to worry about.  It was just Alex and I, and It felt very choose-your-adventure style, I was already in heaven!  

We left Minneapolis headed toward Rapid City, South Dakota- which is where I'll pick things up at next!  Wondering how exciting South Dakota really is (or isn't) or where this dirt road photo was taken?!  Stop back to find out!  Until then, keep it quirky :)

We're Moving (kind of)

Kayd Roy3 Comments

WARNING:  Big. Huge. Earth Shattering Announcement Ahead.

Hello again!  Can you believe it’s been more than three months since you’ve last heard from me?  I’ve had a lot of time to noodle on the blog and what the next step will be…  that and a WHOLE bunch of (more important) life things of course :)  With that said, it’s a bit bittersweet for me to announce that in a few days my blog baby Hammers and High Heels will no longer be “Hammers and High Heels” as I will begin transitioning it over to it’s new title and URL/web address.  The same goes for our Facebook page.

“WTF Carla?!?  Why the hell would you do that?  WHY!?!!"

Looking back to when we began our blog, I had no idea really what it would be or become.  I only knew we were going to share our home renovation photos and stories, then over time as it grew and our audience grew so did my attachment to it's name & title.  So naturally, parting ways with it is somewhat emotional for me but I’ve probably been ready for it for more than a year now.  The ongoing home projects/ renovations/ to-do’s/ painting, repainting/ DIY’s/ etc. got old.  We were over it, the blog world was over it, and then everything got all dull and silent here.  Our home finally felt complete.  There were no more Hammers and High Heels tales to tell and that was when I realized it was appropriate to move on from it. 


So heck no we’re not going away!  We still have a story to tell and questions to ask. Stories about our lives, travels, food, family, fashion, pet peeves, struggles, etc… and I am sure there will still be some about our home or home decor, but that won’t be a primary focus anymore.  

The real gist of it is that the story may be changing, but the voice will remain the same.  It’s still us :)


We’re working on re-naming/re-branding our blog and setting up a new URL location along with a temporary re-direct (so fear not, we’ll help you find our stories while we work on 'finding' them too!).  I'll have all of that information posted up on Monday August 31st, so be sure to stop back so you’ll have all the deets!

Eeeekkk!!!!!  It’s so exciting!  I hope you’ll join Alex and I for a whole new adventure!  And no, we’re not having a baby so don’t ask :)  

Stay tuned….  !

Onto the Next

Kayd Roy1 Comment
Perhaps you have noticed the slowing of blog posts and the lack of house project happenings?  I know I have!  The slowing on projects along with our six year house anniversary milestone last month made me realize something-  We've made this house our home, no longer our ongoing project. 

Things have changed for us in the past year, we've been living more life in these walls than thinking about the color they should be painted- no joke I am honestly tearing up as I type, weird!   Long gone are the days when I traded in my heels for a hammer when I walked through the door.  I don't think my DIY-ing days are done at all but I know that the things that keep me creative, inspired, and driven have shifted and I gotta go where that wind blows :)

Our adventure in this house isn't over but maybe now we're onto the 'next story in the series' and it has a whole new plot... or something like that?  You get what I'm saying right?  Sorry, I seem to be full of cliche's and metaphors all of a sudden.

One thing I do know, is that Hammers and High Heels has always meant something more than just this house renovation and the DIY's we've shared.  This blog helped give me a voice, confidence, and a love for writing that I never knew existed inside of me.  I have truly loved sharing every story on this silly blog- even the ones I knew were dumb to begin with.  I've missed writing.  I've missed the story telling.


With that said, whatever that new story might be, I hope you'll join me on the journey.

To be continued......  !

Six Years, Six of Our Proudest & Most Painful Projects

Kayd Roy1 Comment
Late Friday I realized that it had been six years since the day we closed on our home and moved into this little old Dutch Colonial.  S I X...  Y E A R S... It's sounds like such a long time ago but it feels like I blinked and here we are.  Wish it felt like that when we were in the middle of each house projectright?! 

In those moments, during each and every DIY renovation, it felt like time stood still and we weren't getting anywhere with anything in this house and that it was never going to look the way we dreamed that we could make it look.  Now here we and the place looks nothing like the bland peachy/beige box we walked into six years ago.  The crazy thing looking back now (which is a good thing I must mention for any new fixer-upper owners out there), most of the work we did happened in the first 3 years we owned the house and then more minimal updates happened during the last 2-3 years.

Like I said, I wish it all happened in the blink of an eye but thankfully we didn't totally drag all the projects out over the last six years.  - Ugh, I shutter at the thought of that! - So celebrate our SIXTH year at home, I thought what better than a look back at SIX of our proudest and most painful projects!  Be sure to click the links for a look back at all the posts and drama documented along the way!  Drumroll....

The (My) ClosetWorkspace (additional links here)

The Master Bedroom

The Upstairs Bathroom

The Kitchen

The Dining Room

The Living Room & Fireplace Mantel

Which project do you think was most worth the pain?  

What was the most painful or longest project in your home?

1959 Paris Michelin Guide Map Wall Art DIY

Kayd RoyComment
I've been working on a couple fun DIY projects and have the first ready to share- DIY wall art made from a 1959 Paris Michelin Guide Map!  If you have any bare walls at home and aren't sure what to put on them,  this is a SUPER budget friendly and thoughtful way to add in some wall decor.  
If you have any bare walls at home and aren't sure what to put on them,  this is a SUPER budget friendly and thoughtful way to add in some wall decor.

Kind of crazy that I picked up this 1959 Paris Michelin Guide Map for just $5.00 at an antique store in Hopkins almost TWO years ago!  Can't believe it took me this long to do something with it but truthfully I kind of forgot I had it until I stumbled upon it a couple days ago while doing some spring cleaning and organizing... whoopsie! 
That's when my light bulb moment occurred- I could use these maps for wall decor in the small hallway under the stairs!  So, I thumbed through the guide book and picked out six maps for my 4"x 6" frames and hung them up in the hallway.  

I think the contrast of the black frames really pops against the paint color (Behr's Sandstone Cove) and the dusty pink + red maps create the perfect accent color combo!
I know I haven't shown this space on the blog before so in case you are wondering, the hallway connects our kitchen to the back entryway and the door on the right leads into our scary old basement.  We have a couple topographic maps by the kitchen so I like that the theme/type of art flow is similar through to the hallway.

Like I said, if you have some bare walls you are looking to fill at home be sure to always keep an eye out for interesting books at antique or thrift stores.  Who knows, you might be able to create a whole gallery wall with a couple thrifty book finds!

What do you think of the new DIY wall decor?
Would you have done something different with the guide book maps? I'd love to know!

**********

I'll be working on another forgotten antique find this weekend.  Can you believe I got this antique camping stool almost THREE years ago and haven't done anything with it?!  It's just been sitting in our old gross basement, poor guy.  Anyway, cue the makeover montage music, it's time to get to work!
Ugh, I love a good makeover montage.  I mean who doesn't?!
I'd love to hear any color/finish/fabric suggestions for the stool, let me know! 
Be sure to stop back to see how it turns out!  

Deja Vu or Just the Winter Doldrums?

Kayd RoyComment
Since we are in the worst part of the winter doldrums here in Minnesota, I felt the urge to head over to Bachman's to get some fresh flowers and plants for the house.  Once I got to the store and started looking at the mini potted plants, that deja vu feeling hit me because I suddenly remembered doing the same thing last year AND the year before, blog posts that proved it even (freaky)!  And just look, I am doing it again, LOL!

I suppose it's just an odd time of year- holidays are over, it's not quite spring or close enough to Easter so I suppose I'll just call it my winter doldrums decor update :) highly likely that I'll be doing the same thing next year so why not give it a name right?  Anyway, I'll just get to the whole point of the story and show you the freshened up sideboard decor in the dining room... 

I picked up three $3.99 bundles of Mini Myrtle stems and three $2.50 Delphinium stems at Bachman's and placed them all in my large glass Ikea vase.  I also bought that cute little rosemary plant for #3.99, couldn't resist!  Then, I added in a framed landscape map, ceramic fruit bowl (Alex is really into clementines and kiwis right now, random but not random), and oval mirror on an easel.
I also draped two necklaces I purchased during my first trip to India, I know it's different but I see them as art and not just jewelry so why not display them?  * Sigh *  Traveling sounds like a dream right now!

I have to say, fresh greenery and flowers really does make a difference when cabin fever is hitting hard.  Just having something new to look at counts for a lot too I suppose?  Ugh, can you tell I am tired of being stuck inside?  Winter, barf.  It's just not cute anymore.  Who's with me?!

What do you think of the updated sideboard decor?
Anyone else out there experience deja vu moments during the winter doldrums?!

DIY Zippered Pouch with Angled Corners

Kayd RoyComment
Hello and happy Monday from sub-zero Minneapolis!  Hope you had a nice weekend, I'd say mine was nice-ish because even though I hate being trapped inside during this long stale part of winter, I did manage to tackle a couple sewing projects!  So... WIN (slash "nice-ish")!

First up to share is an update to my DIY Leather Zippered Clutch tutorial from last year.  The new twist- Angled corners!
Not gonna lie, it's a pretty simple update honestly :)  Glad that I went ahead and tried it though because I still use my zippered clutch/pouches all the time and after a year, it's pretty nice to have something a bit different to make the ol' zippered clutch look new and fresh!

The DIY steps start the same as the original tutorial (click here for those steps!) but instead of sewing the rectangular shaped corners, you'll will make a 45 degree angle...
... and then cut off the excess/triangle corner piece.  Easy-peasy!

Like I said, not rocket science or anything, just a simple switch-up to something I've loved for the past year!  They say change is always good, right?

In case you missed them, below are a few pics along with post links for the previous Zippered Clutch tutorials in case you missed them...
 Original DIY Zippered Clutch tutorial 

 Zippered Clutch with Handle Strap tutorial

Hope to share the tote bag I've been working on next!  Fingers crossed it doesn't end up being a huge FAIL... eek!   Wish me luck!

What do you think of the new clutch/pouch shape?

What new twist/update would you have done instead?

Back in the Saddle

Kayd RoyComment
Well, we're nearly done with February already folks.  Where the heck is the time going?!  That I don't know but what I can say (happily) is that I've getting back into my more normal routine of things at home AND with the ol' blog here!

Guess you could say I'm back in the -ahem- DIY saddle again?!?  Hehe, Alex hated that :)

I'm looking forward to sharing what I've been working on, hope you'll swing by to check it out!  See you then!

5 Easy Superbowl Party Planning Tips (Even Last-Minute!)

Kayd RoyComment
Who's excited for tomorrow's big game?  I just got back from my second NYC visit this month and Alex will be returning from London tomorrow!  So at least we'll be able to watch the big game together but we won't be having a big ol' Superbowl shindig like last year... but that doesn't mean we won't be getting a ridiculous amount of food for just the two of us :)  That's part of the fun right?!

Anyway, I'm kinda going to miss the party planning part this year because last year's ended up looking fantastic AND it was pretty easy!  I felt really proud of it so I wanted to share what I learned in case anyone out there doing last minute party prep needs some help!

Here are the five key things that really upped my Super Bowl party game last year:

#1 Butcher Paper
This is genius!  Butcher paper/ food safe paper is cheap, you can decorate it how ever you'd like (gets you away from the cheesy football themed decor- yuck!) and it makes for EASY clean up.  You can cover your entire table with it and place food directly on it if you want to.  What I liked the most about it is that we used it as a key decor element along with black+white.  It'll add a super sophisticated touch to your party and you'll be thankful you used it at the end of the night when it's time to clean up!

#2 Grab-N-Go Paper Snack Bags
Yep, your plain old basic paper lunch bags.  The look ties back to the butcher paper so you'll be looking oh-so clever!  Take them and cut them down to about half the height (I used my pinking shears from my sewing kit to get a zig-zag shape at the top).  Then fill them up with whatever Super Bowl treat you'd like and line them up on your table.  We filled ours with different kinds of popcorn, but another really fun idea would be filling them with thick-cut french fries and letting guests top them they way they like!  Whatever you fill them with, it's a really easy grab and go treat for your guests and MUCH cuter than a big old serving bowl filled with popcorn, chips, etc.

#3  The Bloody Mary Bar
This is an interesting one, more than likely half your guests love Bloody's and the other half hate them.  Nonetheless, everyone will be impressed when they see it and even some of the haters will want to try one.  The DIY drink approach makes people curious :)  For our fixings bar we included pickles, stuffed olives, cheese sticks, pepperoncini, beef jerky or Slim Jims, Tabasco, and Worcestershire with Zing Zang Bloody Mary Mix and Absolut Peppar vodka.

#4 Chalkboards
Okay, I bet most home owner in the US own a chalkboard these days but if you don't you can easily make one to incorporate into your food and/or bar set up. We have quite a few but the ones we used at our Super Bowl party were made the night before- really it's true!  We have a TON of scrap wood in our basement from old house projects so I took a couple plywood pieces (Alex cut them back when he added the wainscoting in our dinning room) and slapped on two coats of chalkboard paint, let them dry overnight and they were ready the next morning!  We used them to list Bloody Mary and Margarita bar directions for our guests.  Decor and inform?!  How can you beat that?!

#5 "Did you try the (fill in the blank)?" Food Fun
My fifth and final tip has to do with the food- and this was something I didn't share photos of last year!  Supply the basics (hot wings, pizza, cheese dip, chips, etc.) to keep everyone happy but include something signature to you and/or whoever you are hosting with.  In my case it was my husband and knowing a lot of his buddies from work were attending he wanted to make the hottest, spiciest chili imaginable just to see who would man up and suffer try it.  He even gave it a name and although it was inappropriate, it added to the fun of the night.  "Did you try the chili?" was the question of the night when it came to the food, so include something that isn't at every Super Bowl party and you'll hear it too!
Not intended to offend, this is an example of the kind of humor I deal with frequently when it comes to Alex & his buddies.

That rounds out the play-by-play for my Super Bowl party tips.  I hope some of you last minute party planners found it helpful!  Even if you just use one of the ideas it might add a fun touch to the elements you've already finished up?!  Hope you have a blast!  Enjoy the game (and commercials, that's my fav)!

What are your key Superbowl party planning tips?
Are you using any of these ideas for your party this year?  Which one(s)?

A Hammer-Less January

Kayd Roy2 Comments
2015 kicked off with a real BANG and I mean "BANG" like someone lit the fuse on a cannon and out I flew at high speed - high heels and all - headed toward the horizon without any hammers... for a little while.

Now, I realize that the whole cannon cartoon going on in my head probably doesn't make much sense to anyone else (usually the case for many other things) so what I mean is that there isn't much of my "Hammers" side going on because things have been quite busy in my "High Heels" world- aka my job.  I spent a couple days in NYC last week for work and will be headed back at the end of the month.  So...
NYC sunset & Empire State Building view from the Standard Hotel after a long day

Because I won't give up my fun husband/family/friend time (and no one should!), blogging and house related things are taking a backseat and I've accepted that I won't be getting much done at home until Feburary, wa-wa :(  At least I got caught up with laundry yesterday because I couldn't find a clean pair of matching socks and all my "1st string" jeans were MIA over the weekend.  It's pretty sad moment when you realize that you're stuck with ill-fitting pants and mismatched socks which leads to the realization that a MOUNTAIN of laundry is waiting for you downstairs.    -SHUDDER-

Anyway, 20 days sans blogging felt a little strange so I just felt like saying something!

What had your January been like?  
Easy going?
Or did the year kick off crazy (ill-fitting) pants style like mine did?

A Look Back at the Old, Looking Forward to the New

Kayd RoyComment
With the new year upon us, I am beginning to take down the remnants of the 2014 holiday season and it made me feel a wee bit nostalgic about the past year.

Looking back at some of our 2014 posts, I realize that the blog we began about our home in 2010 shifted quite a bit with more of a mix about the daily happenings in our lives.  I am not sure what the blog will look like in 2015 but I do know it won't look anything like 2014 because life keeps moving and changing as it should.

I look forward to our new 2015 journey ahead but today I also want to celebrate some of the moments  & projects that made the past year so special.  Here's a look back at a few of my favorite posts from 2014!


That's a wrap on 2014 for us!   Thank you for joining us on these adventures, hope you made the most of 2014 too!   Cheers to all the 2015 moments ahead!