It was brought to my attention a couple weeks ago by one of our readers named Jackie (thanks Jackie!) that our posts on Building a DIY Mantel and Mounting a TV to a Brick Fireplace were leaving out a couple very important details.... like where the heck are all the cords, cable box, DVD player, etc???
REALLY GOOD QUESTIONS! How the heck did we miss that???

I can only say that back in June of 2010, I was VERY new to blogging and I think I was better at confusing people with my typos and run-on sentences than I was at accurately describing our projects. Yep, even blogging takes a lot of practice! So, I'd like to revisit these projects and shed a little more light on how we got our precious TV working with all the TV accessories/gadgets. Also, I think this is a challenge for many people that live in older homes. Heck, a 1920's home certainly wasn't designed to accommodate a location for a TV and all the necessary electrical outlets (another big challenge on this project).
Before I start I should give you a better idea of our Living Room layout.
And just for fun- did you know this is what our Living Room used to look like?
And just for fun- did you know this is what our Living Room used to look like?

The fireplace is centered between 2 windows on the left and the staircase is to the right. At the end is a large window and then an archway where this photo is taken from.

With this layout, we were left with no other options for the location of the TV. It had to go on the fireplace, but that was fine anyway since the fireplace is the focal point of the room.
Here 's how we mounted our TV to the brick:
We picked up a wall mount at Target for $80 and the mason drill bit at Home Depot for $12. Alex measured out the location for the mount where he would need to drill, and marked each spot. Sadly, I do not have more pictures of this process, this was before our blog existed so I didn't document everything. The only thing I took a picture of was Alex wearing my sassy BCBG shades during the drilling since we didn't have safety goggles on hand :) It was hilarious and I didn't want to forget this moment! 
I bet P. Diddy or Dirty Money or whatever his name is would drill wearing stunna shades too....
 Sorry, I couldn't help myself
It took Alex a while and a LOT of pressure to drill as deep as we needed for the wall mount. BUT... we got the TV up!
It took Alex a while and a LOT of pressure to drill as deep as we needed for the wall mount. BUT... we got the TV up!
Then it was time to build a mantel so we could help hide all the crazy cords (and decorate it for each season of course)! In between, we also ripped out all the old icky white carpet then sanded and refinished the wood floors underneath... oh and we painted those peach walls gray too!
Back to the mantel... again, this is what the fireplace looked like before (and how crazy messy the house was, ick!).

Here are the DIY steps for building a fireplace mantel:
To start, Alex picked up 1x2's, 1x3's, 1x4's, to create a frame to stick the wood to. Alex used Loctite Power Grab construction grade adhesive to bind the wood to the brick.

Then he added 1x8's and 1x10's of pine as the face of the mantel. Note: pine chosen over plywood because it has a finished grade. He used the same adhesive and 1 and a 1/2 inch wood screws.

We both picked out the trim for the top of the mantel (which was the fun decorative part). Then Alex nailed all of the trim in, taped off the mantel, and then started painting it to match all of our white trim.

Here is the finished product! Much better right? So inexpensive too! we didn't tally up the cost for each piece of wood and paint at the time but we know it didn't cost more than $100, might even just be $75?

(photo from our Fall 2011 mantel decor post)
Now, where are all the cords for the TV? Where's our cable box and DVD player?
Take a closer look at the left side of our mantel, notice anything new?
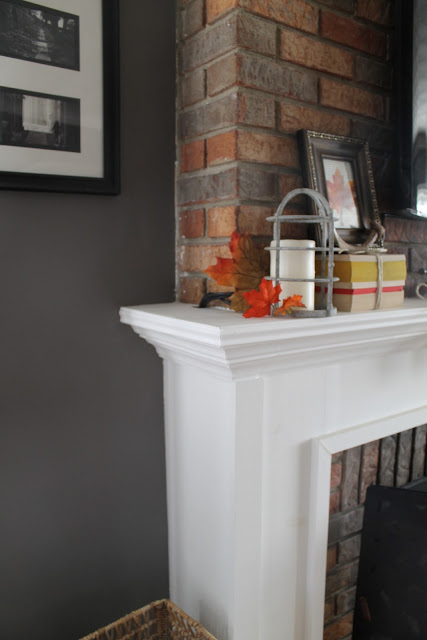
If you spotted this little notch in our mantel you WIN! Just kidding, but that is our little 'cord' secret. When Alex built the mantel he carved out 2 notches for the TV cords, one at the top here and one at the bottom where they come out.

Now, this part is hard to explain since I didn't get photos back when Alex was actually working on it (again, pre-blog existence) so bear with me. The cords come out at the bottom left side of the mantel where Alex drilled a hole into the floor to route the cables into the basement. They travel along the wall and come back up through another hole behind this big Ikea cabinet (I guess they don't sell this exact one anymore? Can't find it online)...

Behind this cabinet is also where the nearest electrical outlet was, so even if we had somehow put the cable box closer to the mantel there still would have been cords to run from the wall. Inside the big Ikea cabinet on the middle shelf (behind the glass part of the door) is where our cable box & DVD player sit. The whole set up is nothing fancy, and we don't have a lot of other fancy pants TV electronics in there so that helped to make it easier (although I think Alex still wonders how he can get the surround sound to work in our house).

All in all, it wasn't the easiest thing to figure out when we got the house, but happy it works for us!
******************
That wraps up how we were able to make a modern TV function in our old 1924 Dutch Colonial with a DIY built mantel and drilling into some brick!
******************
That wraps up how we were able to make a modern TV function in our old 1924 Dutch Colonial with a DIY built mantel and drilling into some brick!
It was kind of fun to take a look back at our house early on. Reminds me that we have put a lot of work into it to make it special and our own!
If you are curious about the original Living Room posts from June 2010 here are the links. Be warned they are confusing and a bit messy!
Living Room: Before and Afters
Carpet removal, sanding and refinishing wood floors
Building a DIY Mantel for Under $100
Mounting a TV to a Brick Fireplace
If you are curious about the original Living Room posts from June 2010 here are the links. Be warned they are confusing and a bit messy!
Living Room: Before and Afters
Carpet removal, sanding and refinishing wood floors
Building a DIY Mantel for Under $100
Mounting a TV to a Brick Fireplace


