I have a super easy DIY project to share that any gal would LOVE! This is a scarf made out of jersey knit fabric with metal snaps so you can wear it several different ways! It is perfect for fall!

You're intrigued right?!?!?
I stumbled upon this idea while looking for a birthday gift for my lovely sister-in-law Amber. Amber is a self proclaimed 'Yoga Geek' that teaches at the Funky Buddha Yoga Hothouse in Grand Rapids, Michigan (she also blogs about yoga here!). I was on Lululemon's website and found a Vinyasa Scarf. It has since been removed from their website (must have been a HOT seller), but here is what it looked like...

It is a jersey knit scarf with snap buttons along each end, I am not sure what makes it a 'Vinyasa Scarf' but that was it's name. I thought Amber would love it and I could make one pretty easily (with my own twist on it of course)! I also thought I'd even like to wear one just for everyday, super cute and I love accessories you can wear multiple ways!
So, let's get started on the tutorial!
You will need: Jersey knit fabric (mine was only $6.99 at JoAnne's), sewing machine, thread, scissors, pins, iron, hammer, measuring tape and 12 snap fasteners (with kit if you don't already have one).
Any jersey knit fabric should work just fine, you can 1.5 yards at JoAnne's Fabric for only $6.99, DEAL! The piece of fabric I had measured 50"W X 54"L and then folded in half (in what will be the finished size) to 25"W x 54"L. With the wrong side out, sew along the length and one end of the width (shown in the white dashed line below).
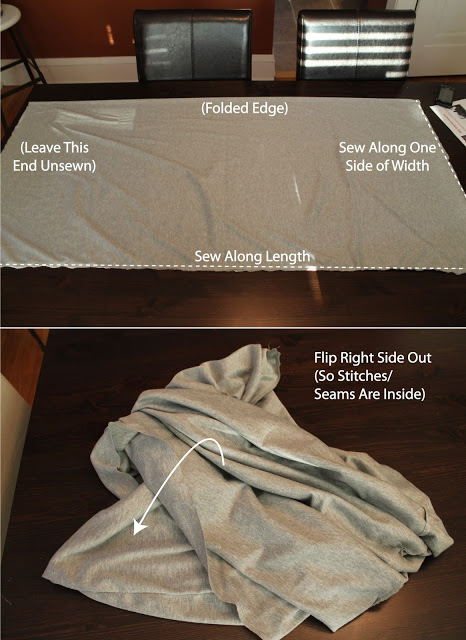
Once you sew those 2 lines, flip it right side out.
Then press the seams you just sewed so they are nice, neat, and flat.
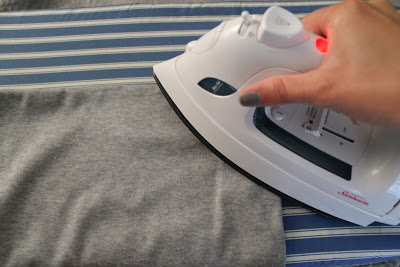
Now, you are left with one end that has unfinished edges. (Make sure your other seams are now inside of the scarf). On this end, you are going to press those unfinished edges in 0.5".

Here is a look at those edges now pressed and folded towards the inside of the scarf.

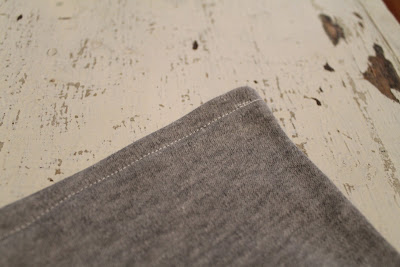
Once you pin those edges together, you are ready to sew them down into place.

Here is what that end of the scarf will look like. It is the only part of the scarf where a stitch seam is visible.
Now, we are done with all the sewing, yay! Time to add the snaps, here are the snap fasteners I picked up at JoAnne's. They are the 16.875" size, and I had to get the kit since I didn't have that little hammer tool you need.

Measure where you want them placed depending on how many snaps you want. I did 11 snaps along the side, so they were spaced about 2.375" apart.

Then grab your fastener tool and hammer those snaps into place. Don't be shy! Use some FORCE to hammer those babies in place so that they won't come loose when you are snapping/ un-snapping when you wear it.

It is a bit tedious, but super easy to do. Here are our snaps on each end!
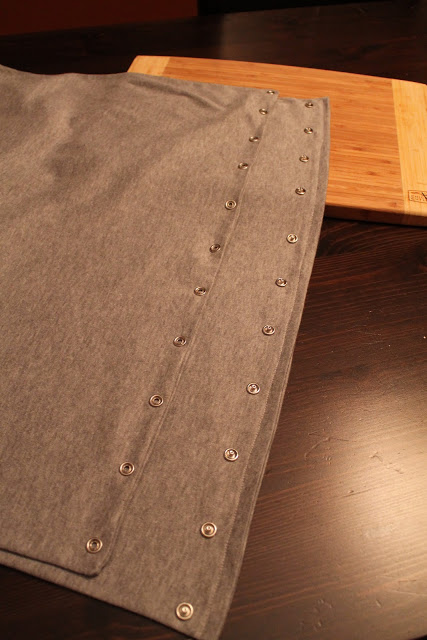
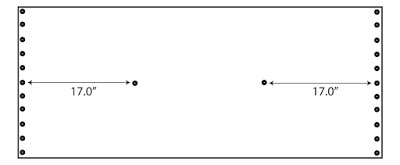
I ended up adding 2 more snaps placed mid way down the scarf (across from the middle (6th) snap) and almost a third of the way in on each end, which measured 17.0". Here is a little diagram:
The Lululemon version didn't have these extra 2 snaps, it was my BRIGHT idea! This allows for more ways to wear this scarf!
THAT'S IT! You are done, super easy right?!?! Now to the fun part, let's see how many ways you can wear it...
Here are my favorite ways to wear it!

I counted 11 different ways, but hey, there might be more? Okay, now I need to mail this to my sister-in-law (thanks for letting me show it off on the blog first!).
Happy (late) birthday Amber! I hope you love this scarf and I hope it comes in handy for your yoga classes (and for super cute everyday wear)!
Now, time to make another one for me!
I've linked this project up over at Centsational Girl's Fall Craft Party!!! Stop by!
